Jul 25 10
by admin
at 6:46 AM

Master Bedroom Makeover: The Vision

Now that I’m finally finished painting the master bedroom (in that perfect blue-gray color that I absolutely love), I’ve started thinking about how I want it decorated.  My plan is to use the colors of sand, ocean, and sky with some whites, interesting textures and brighter decorative accents used sparingly.  I think the look I’m going for is “Seaside Elegance,” coastal chic, “beachy” sophisticated.  Hope that makes sense!  Here are some of the basics I’ve already decided on….

Bedding options:

Cirrus Duvet from Anthropologie

Ruched Duvet from Pottery Barn

Headboard inspiration (we’ll be making our own):

Colette Bed from Crate & Barrel

I’m planning on making my own drop cloth curtains like these (here’s a link to my completed curtains!), and I may add some decorative trim:

image from The Lettered Cottage

I love the idea of a seating area, with two comfy chairs to lounge in, but I’m having trouble working that in to the traffic flow of the room.  The Picky Apple thinks there is NOT room for 2 chairs, so for now we’ll just have a reading nook in the corner with a chair and ottoman (we already have the ottoman)

Ektorp Chair from IKEA
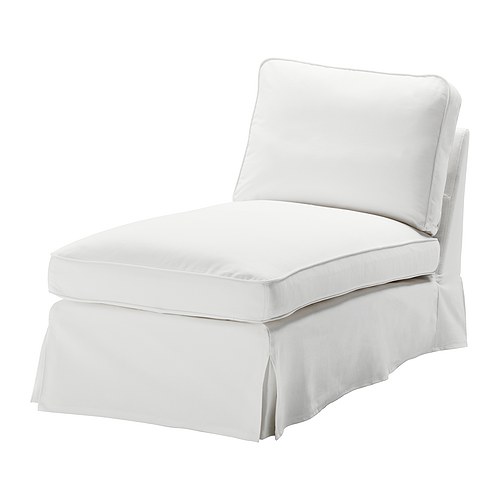
or a chaise

Ektorp Chaise from IKEA


One main element of the room I haven’t quite figured out yet is shelving.  We don’t need any clothing storage in our bedroom (we fortunately have a gigantic closet), but we do need some bookshelves.  I could make an entire wall of shelving, or just use a long low shelf with decorative paintings above….I’m still having trouble picturing what I want.

For decorative accents (where I’ll bring in more color), this is the kind of stuff I have in mind:

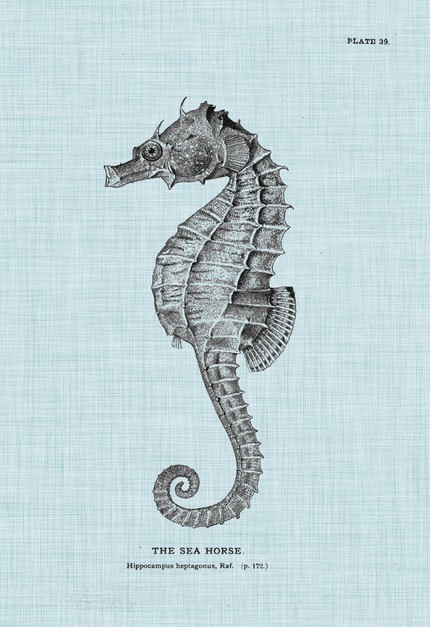
Seahorse Print from Etsy seller YeOldeArteShoppe

Abstract Beach Canvas from Etsy seller breverjohnson

To keep it from being too formal, some signs like this, (though maybe not yellow)…

Beach Rules Vintage Sign from Etsy seller barnowlprimatives

Eva Colored Glass Lamp from Pottery Barn

Alexis Ceramic Lamp from Pottery Barn

Paolo Stripe from Pottery Barn

Link Beach Pillow from By The Sea Decor

Coastal Pillows from Pottery Barn


Are you getting a sense of my vision for this room yet?  I still have a lot to figure out (and purchase/make) but I’m excited about the direction this room is headed.  What do you think?

I’m sharing this post with the Show Me The Progress Party at Serenity Now.

Jul 23 10
by cara
at 3:27 PM

Six Tiring Tidbits

Because I’m still too tired to write a long and coherent post (though I am working very slowly on something home-related), here are a few random tidbits from my week.  My Facebook friends will recognize some of these….

1.  A few days ago, bright and early (5:40) The Littlest Apple woke up and we came downstairs to start our day.  I was in the bathroom for one minute, maybe two.  When I came out, our downstairs was COVERED in flour…..the kitchen, the living room, the dining room, the entry rug, all of it.  He got a box of cake flour (full minus 2 tablespoons) from the pantry and poured it everywhere in those 1-2 minutes I was in the bathroom.  I give myself a big pat on the back for not yelling.  What a way to start the morning.

2.  Yesterday, The Littlest Apple was enthusiastically reenacting a scene from Toy Story while I was working on dinner, and he threw Mr. Potato Head at The Picky Apple’s brand new 47″ flatscreen TV.  The Picky Apple doesn’t even let The Littlest Apple BREATHE near his new pride and joy, so I was a little panicky.  No harm done, thank goodness.  The Littlest Apple and I BOTH would have been in a heap of trouble when The Picky Apple got home from work.  The Littlest Apple and Mr. Potato Head were both sent to timeout.  Again, pat on the back to me for not yelling.

3.  The Littlest Apple’s pump (for his NG tube) has an alarm that beeps in the middle of the night almost every night, usually because The Littlest Apple is laying on the tubing or has gotten tangled up in it.  I’ve started hearing “phantom” beeps in my head throughout the night, similar to the “phantom” screaming I heard for months on end when The Littlest Apple had colic.  The “phantom” beeps (in addition to the real ones) startle me awake, and then I have trouble going back to sleep.  Fun times.

4.  When I went in to check on The Littlest Apple this morning after the pump alarm went off, I discovered that his tube had come open and unhooked from the pump.  The pump was therefore pumping formula all over the bed (and The Littlest Apple’s back), and his tube was leaking formula (and stomach juices…ew ew ew!) all over his bed.  This is the second time that’s happened.  So at 6 am, still groggy, it was necessary to wash all the bedding and stuffed animals and give The Littlest Apple a bath.    What a way to start the morning (again).

5.  When I talked to the pediatrician at yesterday’s checkup about The Littlest Apple’s crazy energy, she said she didn’t think it was from the formula, and that switching formulas probably won’t help.  She thinks this is just how much energy he’s going to have when he’s getting the calories he needs, and started asking if we have a family history of ADD/ADHD.  We don’t (that I know of), but it is something I’m worrying about already.  He turns 3 next month and starts a new more structured preschool in September.  I’m very anxious to see how he adjusts.  The prospect of dealing with this energy level day in/day out is scaring me a little.

6.  I’m trying to encourage The Littlest Apple to be more independent and go to the bathroom by himself.  This has resulted in toilet paper unrolled and SHREDDED all over the bathroom (more than once….the paper gets unrolled nearly every time he’s alone), half the bottle of soap being pumped into the sink for bubbly hand washing time, and The Littlest Apple half naked standing on the bathroom counter.

I’m tired, y’all.

Jul 21 10
by cara
at 2:49 PM

Car Wash

I’ve been spending my normal blogging time (naptime and night-time) sleeping off yet another sinus infection, but hopefully I’ll get my blogging mojo back soon.  I’ve got all kinds of projects and crafts and recipes swirling around in my head, so stay tuned for a more inspiring/crafty/delicious/coherent post!

Here’s a great activity for all of those ride on/in toys.  Give your child a bucket of soapy water, a sponge, and a squirt bottle and let them wash their car!  This truck (isn’t it adorable?) was a 2nd birthday gift from my parents last year. This kept The Littlest Apple busy for nearly an hour as The Picky Apple and I worked in the yard nearby.

Sticking out your tongue helps you concentrate….

And some detail work….

If only our cars were this clean!!

Don’t have a big ride-on toy or an outdoor space for car washes?  Why don’t you have a mini car wash in a tub/sink of soapy water with your toy cars?  This is especially fun after those toy cars have been used for Tire Track Painting.

Jul 18 10
by cara
at 12:42 PM

Spinach and Ricotta Stuffed Shells

I’ve been in a pasta-cooking rut lately, relying primarily on Spaghetti and Meatballs as my go-to pasta dish.  I decided to mix it up last week (and make a meat-free meal) with these stuffed shells.  We really enjoyed, these, especially the homemade Tomato Sauce with Onion and Butter.  Serve with salad and garlic bread, and you’ve got yourself a great dinner (with lots of leftovers!).

Spinach and Ricotta Stuffed Shells

adapted from Real Simple, May 2010

Serves 6-8

Ingredients:

  • 20 jumbo pasta shells (about half a 12-ounce box)
  • 1 recipe of Tomato Sauce with Onion and Butter (or 24-ounce jar marinara sauce)
  • 1 15 ounce container ricotta
  • 2 cups baby spinach, chopped
  • 1/2 cup grated Parmesan (2 ounces)
  • 1 teaspoon minced garlic
  • Kosher salt
  • black pepper
  • 4 ounces provolone

Set an oven rack to the highest position and heat oven to 400 degrees F.  Cook the pasta according to the package directions; drain and run under cold water until cool.

Spread the sauce in the bottom of a large broiler-proof baking dish.

In a bowl, combine the ricotta, spinach, Parmesan, garlic, 1/2 teaspoon salt, and 1/4 teaspoon pepper.  Spoon the mixture into the shells (Picky Apple Note: you will probably have leftover filling…if you use it all, the 20 shells will probably be a little too cheesy) and place them on top of the sauce.  Top evenly with provolone and bake until the shells are heated through, 10 to 12 minutes

Increase heat to broil.  Broil the shells until the cheese begins to brown, 2 to 5 minutes.

Jul 15 10
by cara
at 8:11 PM

Ice Smashing

Instead of writing one big long Tot School post, I’m going to start highlighting some individual activities that The Littlest Apple has enjoyed.  This ice hammering activity was a HUGE hit at our house, perfect for those hot summer afternoons.  The Littlest Apple has asked for it many times since we first tried this a few days ago.  Just freeze some small trinkets overnight in a bowl full of water.  I used gold coins and fish leftover from our sensory bins, cookie cutters and other playdough accessories, and a few little vehicles.  Then just pop the big ice block out, give your kiddo a hammer (a REAL one!) and let them try to “rescue” the trinkets from the ice.  What kid doesn’t love smashing things?!  We’ll be doing this activity again soon!

Jul 12 10
by admin
at 9:30 PM

Smoked Turkey Club Panini

Smoked Turkey Club Panini

adapted from Cook’s Country June/July 2010

Serves 4

Ingredients:

  • 8 slices bacon
  • 1/2 cup sun-dried packed in oil, rinsed, patted dry, and minced plus 2 tablespoons sun-dried tomato oil
  • 8 slices thick-cut crusty bread (I used sourdough)
  • 1/2 pound thinly sliced deli Swiss cheese
  • 1/2 pound thinly sliced deli smoked turkey
  • 2 cups baby arugula

Arrange bacon in a single layer on paper towel lined plate.  Cover with paper towels and microwave until crisp, about 5 minutes.

Brush sun dried tomato oil over 1 side of bread.  Place bread, oil side down , on cutting board.  Layer sun-dried tomatoes and half of cheese on 4 slices of bread, then top with turkey, bacon, arugula, and remaining cheese.  Top with remaining bread, oil side up.

Heat grill pan or large nonstick skillet over medium heat for 1 minute.  Place 2 sandwiches in pan and weight with Dutch oven.  Cook sandwiches until golden brown and cheese is melted, about 5 minutes per side.  Repeat with remaining sandwiches.  Serve.

Jul 11 10
by admin
at 8:58 PM

Apple Picks

Some links to help you start your week off right:

Let Go of Perfectionism: 7 Powerful Tips That Will Help You at The Positivity Blog

I dare you to look at these Brownies and Bars at Tasty Kitchen and NOT want to make brownies immediately.

Cranberry Nectarine Salad at The Sweet’s Life

Super Easy and Cute T-Shirt Refashion at Tatertots & Jello (no sewing machine needed!)

Carseat Cooler Tutorial at eighteen25 (pure genius!!)

Before and After: Foyer at Simply Seleta (love the colors used in this amazing transformation)

Weaving Activities for Young Children at Let the Children Play

Simple Tools for Scientific Discovery at Simple Homeschool

Also, have you noticed that I’ve started posting my Gratitude Journal in the sidebar on the blog?  I try to update it whenever I publish a new post.  If you’re reading through an RSS feed, I hope you’ll click through to check it out from time to time!

Thanks for reading!

Jul 10 10
by admin
at 8:26 PM

Sensory Bin Extravaganza!

Today I created not one but FOUR new sensory bins as birthday gifts for my twin nieces’ 2nd birthday.  They’ve enjoyed playing with The Littlest Apple’s sensory bins, and I was looking for a birthday gift that was a little bit different from the norm.  I really hope the girls enjoy them (and that they don’t come across as 4 bins of junk!)  I had SO much fun shopping for this stuff…a little too much fun actually.  I had so much extra stuff that I’ll have plenty of materials to make a couple of new bins for The Littlest Apple as well!  All of the materials were purchased at Walmart, the $.99 Store, Dollar Tree, or Hobby Lobby.  If you’re looking for a unique gift idea for a preschooler, might I suggest a sensory bin?

Ice Cream Shop Sensory Bin

I saw this idea on Growing Up Our Style and thought it was the perfect summer bin!  This was the simplest of all the bins I put together.

Materials Used:

  • different sized multicolored pom poms
  • white pom poms
  • an ice cube tray
  • ice cream scooper
  • little ice cream bowls shaped like cones and spoons

Rock Garden Sensory Bin

Rocks are always popular for transferring, scooping and sorting, and in this bin, the rocks stand in for dirt for a gardening theme.  (No worms and dirt this time!)

Materials Used:

  • Various sized rocks and pebbles
  • Gardening tools
  • Plastic frogs
  • Silk flowers
  • Pots for planting and scooping

Ocean Sensory Bin

This ocean themed sensory bin is another great one for summer!  No water necessary, just use turquoise aquarium rocks for the water.  I wish I had been able to find more fish.  If I had more time, I would have added a crab and a tiny treasure chest (though there are 2 gold coins hidden in the rocks!).

Materials used:

  • Turquoise aquarium rocks
  • Aquarium net
  • Pink clam dish/scooper
  • Turtle (this and the starfish are toys that “grow” when you place them in water…we just liked the way they looked!)
  • Starfish
  • Seaweed for aquariums
  • Bait fish (these are extra squishy)
  • Foam mermaids
  • Foam glitter fish
  • 2 gold coins

Rainbow Sensory Bin

All credit for this idea goes to Mari-Ann of Counting Coconuts.  I took her idea of a rainbow bin using flowers from a lei and feathers and ran with it.  This bin has SO much stuff going on.  You really can’t even see all the rainbow elements included, but I think all of the bright colors are fun!

Materials used:

  • flowers from 3 leis
  • feathers
  • erasers
  • juggling balls
  • small sensory balls
  • beads
  • jewels
  • polka dot bucket for scooping
  • small cups for scooping

Since I purchased bins with handles on the lids, I just added ribbons and they were ready for gift-giving!

I’m sharing this post with the Weekend Wrap-Up at Tatertots & Jello!

Jul 9 10
by cara
at 8:29 PM

10 Art Supplies Every Preschooler Should Have

Art is messy.  But as long as you approach it with the right mind set-knowing it is going to get a little messy, and with the expectation of cleaning up a mess- it can be an enjoyable experience even for the most neat-freak moms on the planet.  Art is fun, and kids love it.  Not only do they love it, but in my opinion, they NEED it.  I’ve spoken with some moms who would love to do more art projects with their kids, but aren’t sure where to start or what supplies to buy beyond a box of crayons.  One of my favorite places to order art supplies is Discount School Supply.  They have similar products at Lakeshore Learning too, another of my favorite stores!

Here’s a list of basic supplies:

1. Big paper: I prefer to use 12×18″ or larger so the littlest artists have plenty of space for big brush strokes, plenty of room to paint with enthusiasm!  Right now we’re working with Discount School Supply’s White Sulphite Paper-it’s not too thick, but holds up well to big globs of paint and watercolors without bleeding or tearing.

2. Chubby Paint Brushes: These brushes are just the right size for little hands.  They’re easy to grip and hold up well to the roughest painters (The Littlest Apple is one of those!)

3.  Plastic Trays:  These trays are so versatile!  You can put paint directly on them, use them to corral project supplies, or even for serving snacks.  They wash easily- I even put mine in the dishwasher.

4.  Easel: Okay, we don’t actually have one of these yet.  But it’s definitely on our wish list.  I occasionally tape our big paper to the wall or fence outside for an upright painting experience, but I’d really like to get an easel.  Easels are great for developing the muscles of the arms in a different way that simply painting on a table can.  And there’s the additional exercise and full body experience of standing and painting in front of an easel.  I think this would be great for my fidgety guy who can’t sit still for anything!  If you don’t have room or choose not to leave one out in your home, then look for one that can collapse for easy storage.

5.  Washable Tempera paints: Obviously washable is the key phrase here.  The Colorations Simply Washable Tempera Paints from Discount School Supply are the ones we use at home and for our Art Playgroup, and they clean easily off of clothes, skin, walls, white slipcovers (first hand experience with all of those).  I’ve linked to a set, but you can also order the bottles individually.  The colors are vivid, and the paint lasts a LONG time.

6.  Liquid Watercolors:  These are a million times better than those little watercolor cakes-the kind you have to dip your brush in water to use.  Those are just a little too difficult for little artists.  But these liquid watercolors are amazing!  Use them directly out of the bottle for super-vivid colors, or add water for a more muted (but still plenty bright!) effect.  There are so many different uses for these, and I’ll discuss those in an upcoming post.

7. Do-A-Dot Markers: These are definitely a good place to start if you’re afraid of just letting your child loose with paint.  (Not that I would ever advise just letting your kids loose with paint, but you know what I mean).  There are no big spills to clean up.

8.  Glue/Glue Stick:  You can make all sorts of creations using glue!  I like to create theme collages with cutouts from magazines or newspapers. We’ve done vacuums, baking, pumpkins, hearts, and flags.  It’s also fun to glue ribbon, pasta, buttons, beads, feathers, cereal, glitter.  The options are endless, and if your child is anything like mine, he/she will be totally fascinated by glue.  I like to present the glue in different forms.  Sometimes we use glue sticks (and these are best for the youngest artists who can’t squeeze the glue tube yet), sometime we use Elmer’s, and sometimes I mix it with water and let him paint it on with a paintbrush or apply it with a q-tip. If we’re using fabric or heavier buttons, I like to use Tacky Glue.

9. Markers: We’ve got a great set of Crayola Pipsqueak markers, with nearly every color you could need (and then some).  These are the perfect size for little hands.

10. Chalk/ Chalkboard:  This is becoming a new favorite at our house.  My son loves to write on his chalkboard then erase it.  We’ve also had fun with chalk outside, using it to draw on the patio and even on the bricks of our house!  I’m going to try making my own sidewalk chalk sometime soon, so stay tuned!

What are your favorite preschool art supplies?

Jul 7 10
by admin
at 8:10 PM

Oven Fries

This is the first recipe for oven fries that I’ve had any luck with.  In the past, my oven fries have been too crispy or too oily (or both).  These turned out perfectly crispy on the outside and creamy on the inside.  As usual The America’s Test Kitchen delivers delicious and exhaustively tested recipes in this solid cookbook!


Oven Fries

adapted from The America’s Test Kitchen Family Cookbook

Ingredients:

  • 2 large russet potatoes (10 ounces each)
  • 5 tablespoons vegetable oil
  • Kosher salt
  • Pepper
  • Seasoned salt
  • Sugar

Adjust an oven rack to the lowest position and heat the oven to 475 degrees F.  Cut the potatoes in half lengthwise, then slice each half into 10 to 12 evenly sliced wedges.  Place the potatoes in a large bowl, cover with hot tap water, and allow to soak for 10 minutes.  While the potatoes are soaking, coat a heavy-duty rimmed baking sheet with 4 tablespoons of the oil.  Sprinkle the baking sheet evenly with 3/4 teaspoon of salt, 1/4 teaspoon pepper, a dash of seasoned salt, and a dash of sugar.

Drain the potatoes, spread them out over paper towels, and pat them dry thoroughly.  Toss the dried potatoes with the remaining 1 tablespoon oil.  Arrange the potatoes in a single layer over the prepared baking sheet.  Cover the sheet tightly with foil and bake for 5 minutes.

Remove the foil and continue to bake until the sides of the potatoes touching the pan are crusty and golden, 15 to 20 minutes, rotating the baking sheet after 10 minutes.

Using a metal spatula, scrape to loosen the potatoes from the pan, then flip each wedge over (keeping the potatoes in a single layer).  Continue to bake until the fries are golden and crisp on both sides, 10 to 15 minutes longer, rotating the pan as needed if the fries are browning unevenly.  Transfer the fries to a paper-towel-lined plate to drain and season with salt and pepper to taste.

Blog Widget by LinkWithin