Halloween Ribbon Wreath
This is my favorite craft to date. And yes, I think I said that about the last wreath I made. But I had SO MUCH fun working on this wreath (well, except for the spray adhesive on my hand…more on that momentarily). This was tedious and time consuming, but what a labor of love! I enjoyed every single second of this project.

I don’t normally decorate for Halloween. I’ve got my Fall decorations-my pumpkins and apples and leaves-but I’m just not into Halloween. Unlike most of our neighbors, who go ALL OUT for Halloween (with realistic things hanging in the trees, inflatables, tombstones, and a haunted house for the trick-or-treaters), I don’t like all the scary, creepy, ghoulish decorating, and I don’t really like dressing up either. But when I saw the Happy Halloween Wreath that Jen from Tatertots and Jello (my craft-making hero!) made, I decided that maybe there was a way to decorate for Halloween in a happy, cute, fun way after all! I owe Jen a million thanks for her amazing wreath idea and great photo tutorial. I never would have thought of this on my own! So this is my spin on a Happy Halloween Wreath.
I started by wrapping a 12″ foam wreath in wide ribbon (I used black), pinning it at first, and gluing it down as I went. Do you really need to see what this step looks like? Okay, here you go…

Now, let the ribbon cutting begin! You’re going to need lots and LOTS and LOTS of ribbon. I ran out of ribbon twice and had to go back for more. HOW much should you buy? Well, it depends. (I know…so helpful!). It depends on how thick you bunch the ribbons together, and it depends on whether or not you plan to completely cover the inside and outside of the wreath (instead of just the front). I completely covered the outside of my wreath, so I needed a small truckload of ribbon. I used at least 138 feet of ribbon. Then I lost track. Here are my ribbon tips:
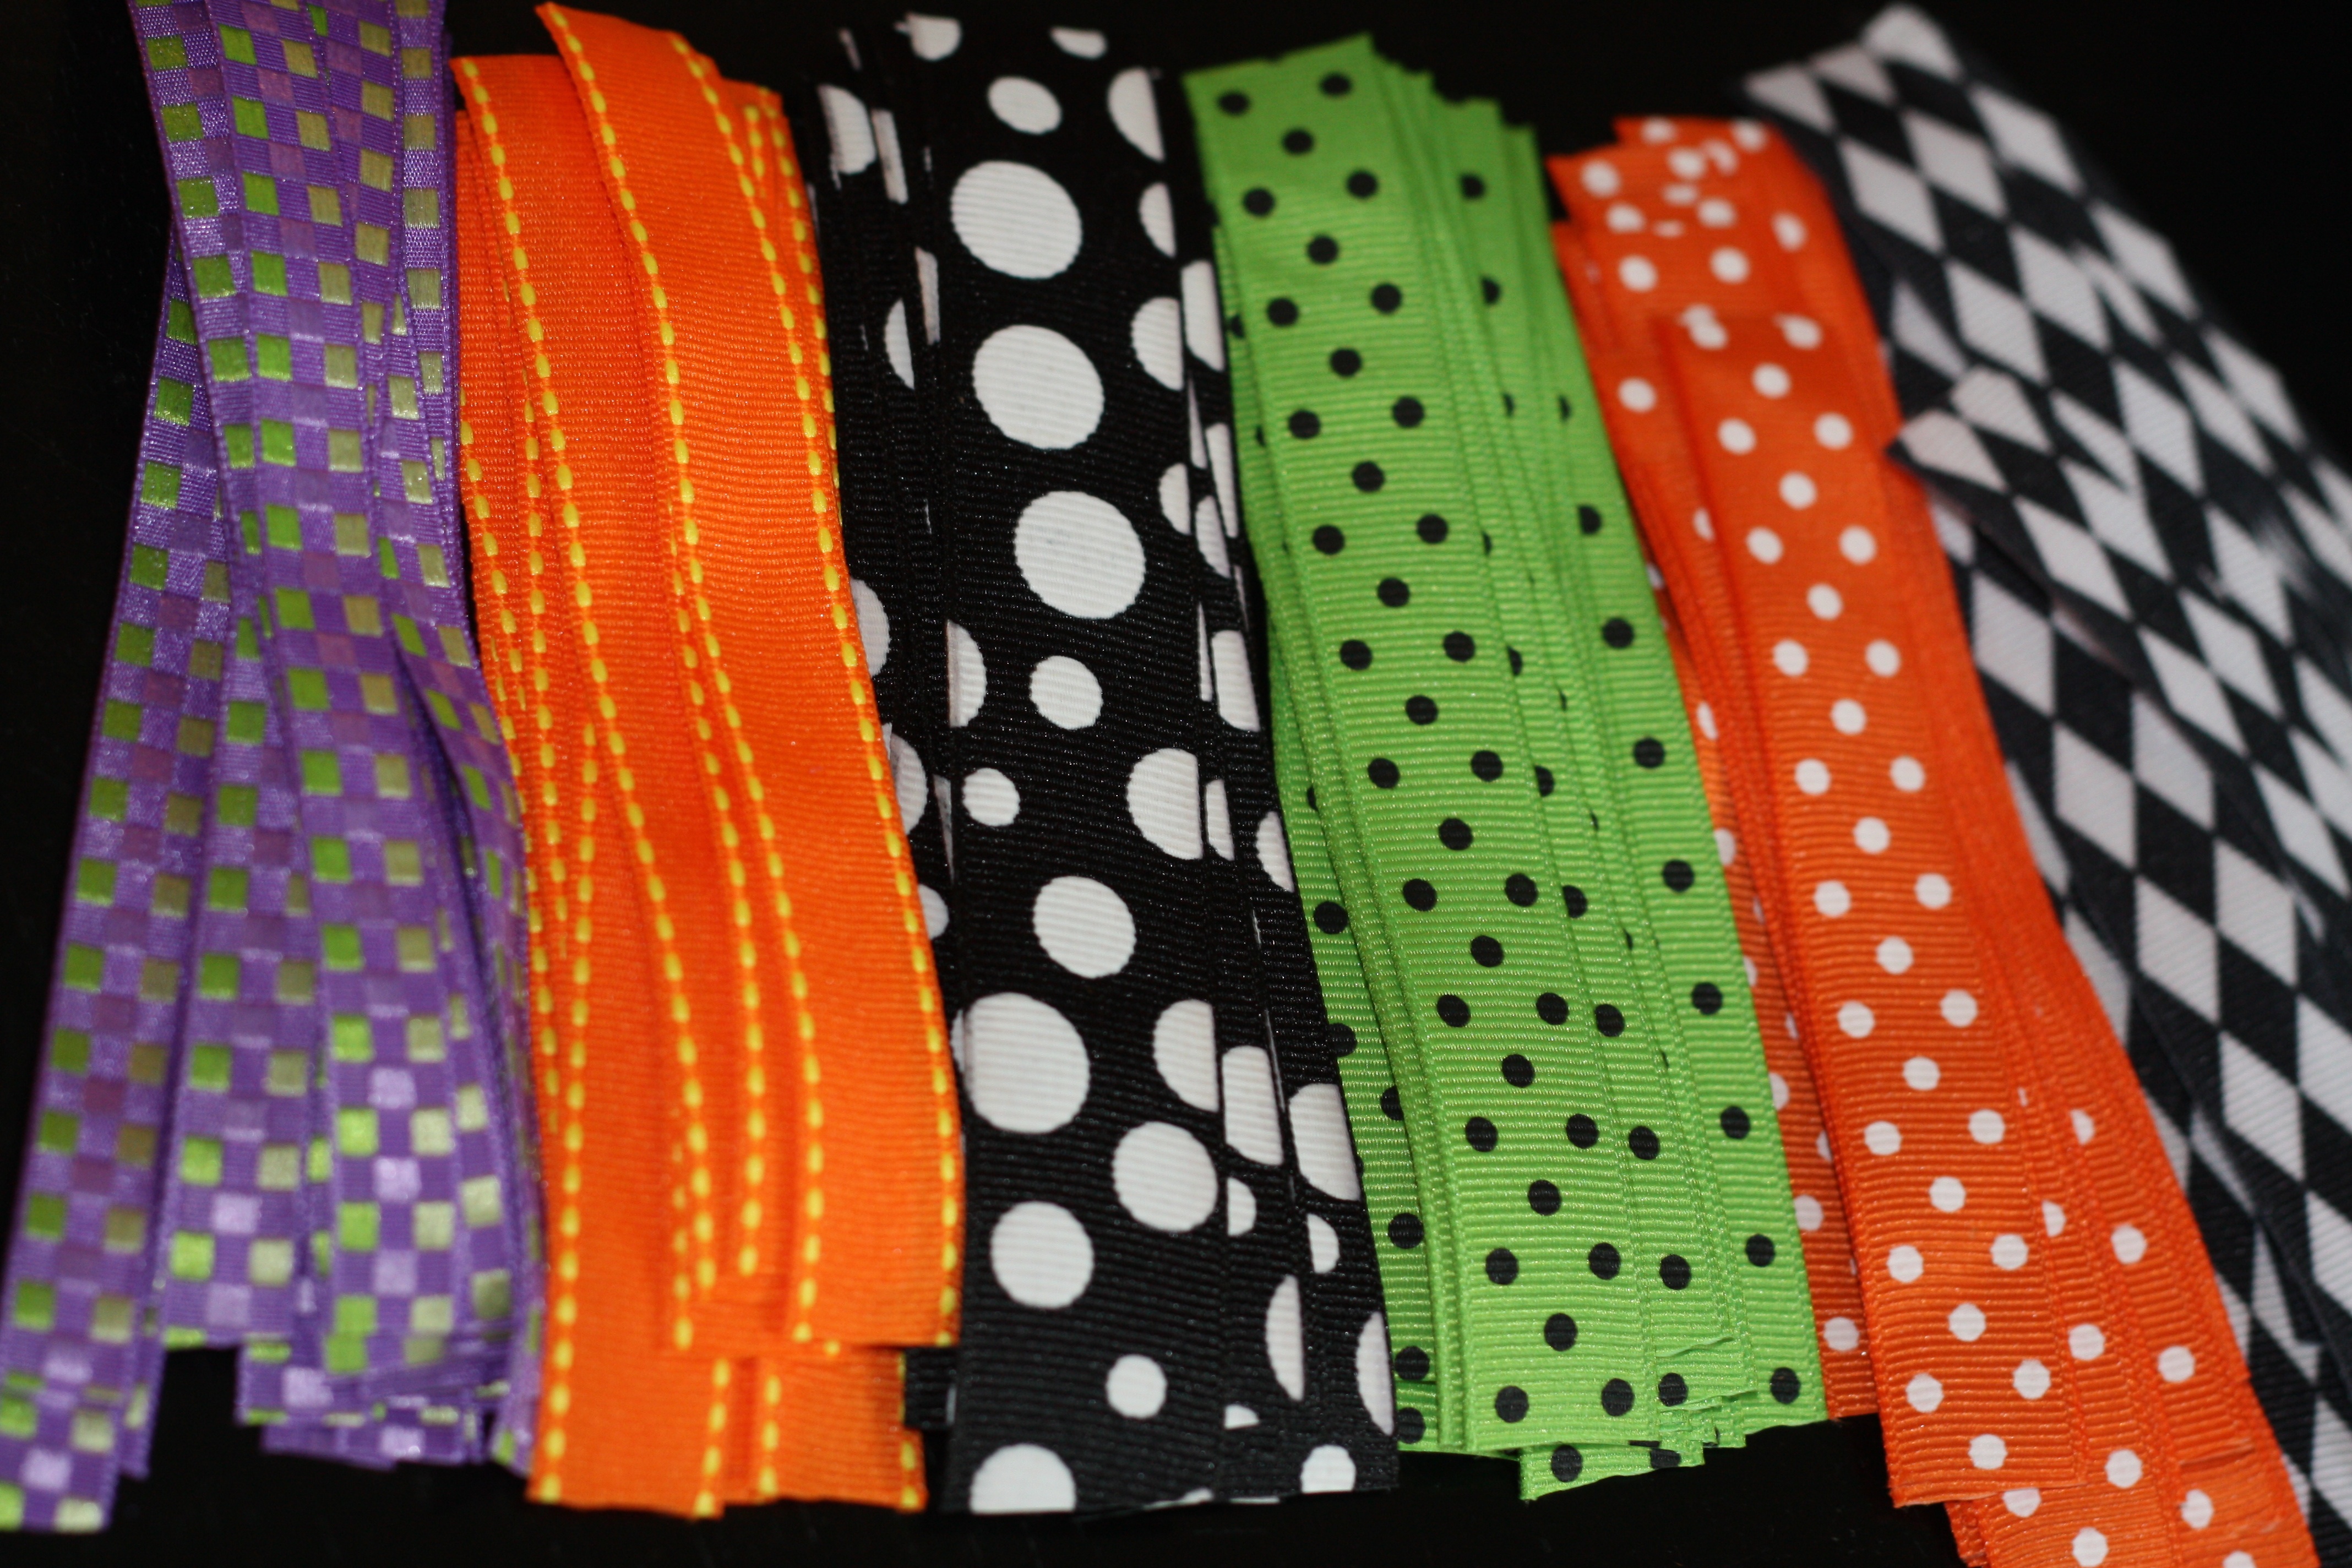
- stick to a fairly tight color scheme. mine was black, orange, purple lime green, and white
- use varying widths of ribbon. I wish I had used more wide ribbon.
- Select 10-15 different ribbons. I used 12, partly because when I ran out the first time, I could no longer locate the ribbons I picked the first time. I had to mix in new patterns (and yes, my non-flexible self had to do some deep breathing when I first realized this). But I LOVE the interest my 12 different ribbons add.
- avoid sheer ribbon unless you enjoy getting hot glue all over your fingers. Lesson learned.
Here is my ribbon “line-up,” minus one. This was definitely a handy piece of paper to have when I had to run back to buy more ribbon. I was clearly drawn to polka dots. Guess what? Polka dots make me happy. So does that harlequin pattern.

Cut the ribbon into 4.5 inch strips. I measured one every few minutes to use as a guide strip, but for the most part, I eyeballed it. Mine probably range from 4 -6 inches. But that’s okay. We’ll call that “adding visual interest” instead of being sloppy, ok?

Now it’s time to create loops with the ribbon, leaving a little room (approx 1/4″) at the bottom, beneath the “seam.” You can either sew these, as Jen from Tatertots and Jello did, or if you don’t have a sewing machine, you can hot glue them like I did. I worked with 3 to 4 strips of ribbon at a time…that’s how fast I could glue then fold them down before the hot glue dried. I just threw all of my loops in a big box as I went.

Think you’ve got enough? You probably don’t. Make MORE!
Time to start gluing your ribbon loops to the wreath form. I worked on the front/top of the wreath first. You need to separate the part of the ribbon below the “seam” you created. That’s what you’ll be gluing down. See what I mean in this not-so-great-photo below?

Just keep adding more loops to your wreath, placing them at random angles. Shove them together as close as you can so your wreath will look nice and full.
Once you have the top of the wreath filled in, it’s time to work on the sides! I was struggling with my method for the sides until The Picky Apple stepped in with his genius suggestion to layer the ribbons on the side, so the top of the loops are all still facing the front of the wreath (instead of poking off to the sides…). Either way could work, but this is what I did. See how they are all facing up toward the top of the wreath?

Yay! What a beautiful ribbon wreath! You could totally stop here. (And I’ll admit that if I hadn’t already purchased my letters, I might have.)
But let’s add some pizazz! Jen from Tatertots and Jello added a glittery “31” to hers, and I opted to add “BOO” to mine. I have not yet mastered the art of applying glitter to things. For my first coat, I used Mod Podge (which I pronounce and read as Modge Podge). Once that dried, I wanted MORE glitter, so I added a coat of spray adhesive and more glitter. Spray adhesive is wonderful, and did the trick. But don’t get it on your hands….it doesn’t come off easily. And if you’re playing with glitter too, then you’ll wind up like this…

(Those are my hands, not The Littlest Apple’s. Remember how I said I had small hands?) Now, how to get those letters stuck on the wreath? Jen from Tatertots and Jello used some large wooden beads. I bought some, but mine weren’t quite big enough. Since I was getting antsy to just be finished, I got creative and shopped the house for a solution.
I covered some of The Littlest Apple’s blocks in ribbon, like this…

Then I hot glued the blocks to the wreath, then glued the glittery letters to the blocks. I was going for an off-centered look, but that “O” on the right looks like he’s saying “Help! I’m falling off the wreath!” He’s not. He’s glued on very securely. Just a little crooked.

I LOVE my new wreath! I’m already thinking about making another ribbon wreath for Christmas or Easter (or both!). The possibilities and color combos for this type of wreath are ENDLESS!

I’m sharing this post with…


Love it! It looks so cute. I’m not sure if I’d have the patience for it…looks like lots of work! 🙂
Tanya-
Thanks! Patience isn’t exactly my strong suit either, but I had so much fun working on this wreath that it didn’t really seem like “work.”
WOW – your wreath is gorgeous!!! I love it. And great ideas that you improved upon mine with. I love how you faced the ribbon so it points toward the center of the wreath. I love the BOO too. Wonderful job! And your ribbon choices are fantastic!
Love it!
xox
Jen
Love it! I already have a Halloween wreath in the works, but I’ll definitely be borrowing your technique for a Christmas one. Thank you so much for sharing!
Such a great idea. Your wreath turned out fantabulous! Thank you for sharing! :o)
Wow! That looks like so much work, but it turned out so cute! I don’t like the creepy, scary decorations for Halloween either. Probably because my girls get scared easily, and my hubby really isn’t into Halloween.
This is adorable! I must say you have amazing patience, I’m not sure I could finish it without swear words flying-lol.
I’m wondering if you tried stapling the ribbons before hot gluing them? I have 2 blisters on my fingers right now from hot glue and will do basically anything to avoid using that glue gun again any time soon ;).
Anyway, fabulous, and your small hands made me laugh when I realized they weren’t one of your kids’!
Oh, and I forgot to tell you I found this project on The Sunday Showcase!
I LOVE THIS! I just have to make one now! I was wondering, when you glued the wide black ribbon to the foam wreath, what kind of glue did you use?
Amber-
Patience has never been my strong suit either, but I found cutting and gluing all of that ribbon quite theraputic!
I only got a few little hot glue gun burns. I’ve got a low heat glue gun, so maybe it’s not quite as hot as yours? Stapling would definitely be another way to try this.
Michelle,
I used tacky glue when gluing the wide black ribbon to the foam wreath, but hot glue would work too! This is such a fun project, and I’m so glad you were inspired to try it.
Super cute! I adore this wreath! Found you over on Tatertots and Jello 🙂
I love your wreath – this inspires me. Now I just need to find the time :o)
Thanks for sharing!
I love this!!!! It’s so colorful and cute. I don’t get into the really gory or scary Halloween decorations either. It seems so time consuming though. Would you like to just make me one? haha!
loving it very much – will try it for sure ..
GORGEOUS, Cara! I love this.
Your wreath turned out GORGEOUS!!!
I must confess…this is what I worked on ALL DAY yesterday and I’m just not pleased. 🙁 I’m going to get more ribbon and keep adding more in hopes I’ll get happy with mine…but so far I can still see the insides too much and I worked for HOURS. 🙁
love this, it’s super cute!
How dang cute is that? Great job!
This is a great project! I love how your wreath came out.
This is super cute! It’s so well done – I’m sure it looks great on your door.
so cute!!! i don’t think i would have the patience! 🙂
That’s amazing. It looks like it WAS a lot of work but totally worth it. I admit, we usually go more towards the spooky decor (because my daughter loves it), but I’m really liking the whimsical, more cutesy stuff this year.
Thanks for the tip on spray adhesive and glitter, will think about wearing gloves. Thanks for linking up.
I’m having the best time checking out all the different versions of this gorgeous wreath. I love all the ribbon! I would also LOVE to link to this if you didn’t mind.
Rachel,
Thanks so much! I would LOVE to have you link to this post. That would be such an honor. I read your blog daily and always find lots of great inspiration.
I absolutely love this wreath! I just stumbled upon your blog this morning and my creative juices are flowing now! 😉
I’d love to link to this, if you don’t mind. Your brilliance should be shared! 😉
Thanks again for the wonderful ideas!
This is so flipping cute. I can’t even take it…great job! I might be a little late to the Halloween game (would never get this done in time), but I’m definitely trying this for Christmas! Thanks for the awesome tutorial!
Thanks y’all! Who knew that a little ole’ wreath would generate so many comments?!
I’ve been eyeing the gorgeous Christmas ribbon at Hobby Lobby and Michael’s that would be just perfect for this project! I’ve already got a wreath I love for Christmas, but I’m SURE I could find somewhere else in the house to hang a ribbon wreath.
If any of you wind up making a wreath like this, I’d love to hear about it and see photos!
This Halloween wreath is such a cool idea… love that you involved the “little apples” in the process too. We will definitely try making one of these this year to decorate our front door 🙂
I write for a green blog and we just published a Halloween recipe for spooky severed Jalapeno fingers if you’re interested?
http://www.oureverydayearth.com/2010/10/06/simple-halloween-recipe-severed-jalapeno-fingers/
Lovely! Thank you!
Cara, thank you so much for posting this tutorial! I made my own version and have gotten so many compliments. My Dh asked me where I had purchased it *LOL*!
LOVE THIS! I’ve been seeing different versions of this going around the internet. I saw one go around where she used tiny pins to secure the ribbon. I wonder if that would be easier than sewing? (I don’t sew). I DO have a hot glue gun, but I’m very clumsy and would probably burn my hands repeatedly, lol. Thinking forward to a Christmas wreath…
too cute! just featured it on my blog
love it! just finished mine up! 🙂 also trying out some of your tex mex recipes.. good stuff! 🙂
so going to try this for a Christmas wreath…now off to michaels ;o)
thanks for the tutorial!
~Tiffany
What an awesome wreath!!!!!! Love it
I made a ribbon wreath similar to this well over 20 years ago. I used a straw wreath as a base )and I think I left the plastic around the straw) and used floral picks (or were they staples) to secure the ribbon to the wreath. I used the same width ribbon and stuck with I think just 3, maybe 4 patterns. I used cloth and the satiny ribbon. Someone posted that they didn’t like the way theirs turned out – maybe just using a few patterns, it might make it easier to do until you really get the hang of it and have played with multiple patterns. I do like the idea of stitching and then gluing, but the way I did it seemed to work well for me – fingers were a little sore afterward from pushing in those staples, but I really liked the way it turned out. And I did it on a heart shaped straw wreath. Will have to see if I can dig it out and take a pic to add.Â
Did you glue the loops of ribbon down with a hot glue gun?
Love it! Started mine last night…my 2 year old daughter had so much fun playing with all the ribbons…Thanks!
Actually-no, but I would like to try it. Last week I cut up single loops about 6-8 inches long – should have found my original wreath before I started. I use the ‘fern’ pins and push in to a straw wreath – I don’t take off the plastic wrapper though. When I found my wreath – I noticed I had used about 10-11 inches of ribben. Made the bunny ears and put the pin in the middle, pinching the ribbon, then catching the center of the ribbon and then both ends back under the pin – giving me 2 loops at once.Â
On the one that I had just started, the single loops are doing me in – that’s why I’d like to try the hot glue, but I have pins and ribbon to use up – when I run out of both, I’ll try the glue gun. On my working one, I’m using all satin pastels in various widths. When I first put in my first color, I decided to have my first color put in with 5 sections – kind of like the points on the star, instead of thirds. Still gives a random effect, and not necessarilly an evident pattern. I’ve tried to do them with first 1 ribbon, then put 2 underneath it, then 3 underneath those, kind of like a pyramid effect, and then keep going down the inside and the outsdie of the wreath until I get to my next starter ribbon. Then I go back and fill in opposite way – if that makes sense to you the way I am describing it.
I’m sure it can be done the same way with the glue gun, but I have to play with it and right now ( just want to use up materials. Happy wreathing!
I think I could actually do this!
Love it! I just featured this cute wreath on my blog and if I try it, I will post the results…
http://jalapenodoughnut.blogspot.com/2011/09/are-you-there-fall-its-me-jalapeno.html
I LOVE this, but I feel like it was probably SO expensive for all that ribbon. Â Do you have an estimate as to how many yards you ended up using?
Huge fan of this wreath! I featured yours on my blog and tried one myself….here’s the link!
http://onecraftymama-2011.blogspot.com/2011/09/spook-tacular-halloween-ribbon-wreaths.html
I’m finishing up my first one today! Â Love it! Â I posted a picture of my wreath before any accents were added and got many comments on Facebook! I can’t wait to start on a Christmas one! Â 🙂 Â Thanks so much for posting this!
Love the wreath! I cant wait to make one. Questions about where you got stuff:
Where did you buy that particular collection of ribbon, the wreath, the blocks, and the letters? I would appreciate the info!