Here’s a quick and easy recipe that is one of Nathan’s favorites.
Taco Rice
adapted from 30 Day Gourmet Freezer Cooking Manual
Ingredients:
- 1 lb ground beef
- 1 taco seasoning packet (I used Old El Paso)
- 1 can Rotel
- 2 cups cooked white or brown rice
Directions:
Brown meat and drain. Combine meat, taco seasoning, cooked rice, and Rotel in a saucepan and simmer until thick, about 30 minutes. Serve with cheese and tortillas.
Picky Apple Note:  This recipe freezes and reheats well. Double the recipe, and freeze half of it for another night!
Here at the home of The Picky Apple, we’ve been branching out to try meats we don’t eat on a regular basis. Since I usually buy meat when it is on sale, we normally have a lot of chicken dishes and dishes using ground chuck. One of the new things we’ve been eating more of is pork tenderloin. This recipe uses Fischer & Wieser Roasted Raspberry Chipotle Sauce as a nice finish to an already delicious pork tenderloin. I’ve found that I never quite get the pork cooked all the way through simply by grilling outdoors or using a grill pan inside, so I recommend a combination of searing on the grill or grill pan, then roasting in the oven.
Grilled Pork Tenderloin with Roasted Raspberry Chipotle Sauce
Adapted from Fischer and Wieser recipe
1/2 cup olive oil
2 teaspoons minced fresh rosemary
1 tablespoons minced garlic
1 teaspoon sea salt
1-1/2 teaspoons freshly ground black pepper
2 (about 1 pound each) pork tenderloins, trimmed
1 (15.75 oz.) bottle Fischer & Wieser’s The Original Roasted Raspberry Chipotle Sauce®
Whisk together olive oil, rosemary, minced garlic, sea salt and pepper. Rub generously onto pork tenderloins.  Cook on grill or grill pan on each side until browned, approximately 5 minutes per side. Transfer to baking dish, and cook at 400° for 30 minutes or until cooked through. Heat Raspberry Chipotle Sauce in microwave or in saucepan, and serve with sliced pork tenderloin.
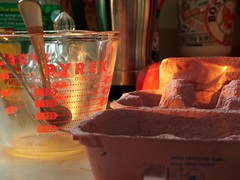 My Messy Kitchen 1Originally uploaded by Tim Somero
When I am baking or cooking, I’m messy. Really messy. Think Tasmanian Devil in the kitchen. And it doesn’t help that our countertops are black granite. Spilled flour powdered sugar everything really shows up on those. I always complete whatever dish it is I’m making, THEN start to clean (if The Littlest Apple allows, otherwise I have to come back to the cleaning later, whenever that is). This drives Nathan crazy. He, who does not do the cooking but offers plenty of advice and comments from the sidelines, says I should clean the dishes, pots, pans, etc. as I go. I say that’s impossible….especially when working on recipes that call for adding certain things at certain points in the process. You know what I mean, right? Although my KitchenAid is super fantastic, it doesn’t necessarily know when to stop what it is doing. It doesn’t know when the dough is sufficiently mixed, but not overworked. (But I’d definitely buy a “smart” mixer like that if it existed!) So I have to pay attention to what I’m making, and that doesn’t mesh well with the clean-as-you-go philosophy my husband subscribes to. How do you deal with cleaning up when you cook? Do you clean as you go, or clean up at the end? I’m thinking that I’m in the majority on this topic, but perhaps you’ll prove me wrong.
A few weeks ago, we went to Pappas Bros. Steakhouse to celebrate our anniversary. The crab cakes, steaks, skillet potatoes, turtle pie were all good, but it was my Steakhouse Salad that was the highlight of the meal for me. In fact, it was one of the best salads I’ve ever had. It consisted of field greens, paper-thin sliced apples & oranges with Roquefort cheese, candied almonds and bacon crumbles. The dressing was a slightly sweet and tart. I’ve tried to recreate the salad at home a couple of times, and while it isn’t that hard to get a pretty good match for the salad itself (though getting paper-thin orange slices is tricky), the dressing is a little harder to replicate. The dressing is what really “completes” the salad. There wasn’t a description of the dressing on the menu, so I’m just trying to create it from memory. I’m going to try again this week with some olive oil, apple cider vinegar, and a little bit of sugar or honey.
Speaking of salads…Miss Ginsu, who spent nine months making salads in a restaurant, has a great chart for the salad-impaired on unlocking the salad code. Hmm. Perhaps I’ll try out a red wine vinaigrette next for my Steakhouse Salad.
Last night we had homemade pizza. I typically purchase frozen bread dough for homemade pizza crust, roll it out, and sprinkle it with garlic salt or whatever spices sound good at the time. However, I’m out of frozen bread dough, and my usual grocery store doesn’t carry it, so I decided to try my hand at making pizza crust myself. I used a recipe from 30 Day Gourmet, and froze one of the two pizzas I made. The crust tasted good, not great. Better than the frozen bread dough I used to buy.
 Self Rising Pizza Crust
- 1 quick rising yeast packet
- 1 t. sugar
- 1 1/3 cups warm water
- 1 t. salt
- 3 cups flour
- 1 1/2 t. olive oil
- 1/2 t. corn meal
Directions:
Mix water, sugar and yeast in a separate container and let sit for at least 5 minutes. Add oil to the yeast mixture. Pour salt and flour into a food processor and slowly pour yeast mixture in while processing. Mix until dough forms a ball. Dough will be sticky, but should still pull away from the side of the processor bowl. Spray a bowl with nonstick spray and place the dough in it, turning it to coat both sides, cover and let it rest for 25 minutes. After the 25 minute resting time, divide the dough in half. For best results, sprinkle corn meal onto baking surface, and roll into two 12 inch circles directly on cooking surface. Top as desired. Bake at 425 °: for 25 to 30 minutes.
 Picky Apple Note: Here is a great tip for getting perfectly round pizza dough every time from the King Arthur Flour Baker’s Banter blog.
This has just been one of those weeks. It is cold and rainy outside and I’m not getting any sleep (the Littlest Apple is waking up at LEAST every 2 hours at night, and not napping during the day), so I really wanted some comfort food. Something not too time consuming to make. Something cheesy. Something noodle-y. And I already had chopped chicken on hand, leftover from the enchiladas I made last week. I’ve cooked this Four Cheese Chicken Fettuccine recipe several times before, and it was one of the dishes I put in my freezer for after Littlest Apple was born. I got the recipe from one of the Yahoo Groups I belong to. Supposedly it is from Light and Tasty magazine. There’s absolutely nothing light about it (heavy cream, butter, four types of cheese, hello!?), but it is certainly tasty.  I’m normally not a big fan of casseroles made with “cream of _____” soups, but this one is delicious. Tastes great leftover too!
 Four Cheese Chicken Fettuccine
- 8 oz uncooked fettuccine
- 1 can (10 3/4 oz) condensed cream of mushroom soup
- 1 package (8 oz) cream cheese, cubed
- 1 jar (4 1/2 oz) sliced mushrooms, drained
- 1 cup heavy whipping cream
- 1/2 cup butter
- 1/4 teaspoon garlic powder
- 3/4 cup grated Parmesan cheese
- 1/2 cup shredded Mozzarella cheese
- 1/2 cup shredded Swiss cheese
- 2 1/2 cups cubed cooked chicken
Topping:
- 1/3 cup seasoned bread crumbs
- 2 tablespoons butter, melted
- 1 to 2 tablespoons grated Parmesan cheese
Directions:
- Cook fettuccine according to package directions.
- Meanwhile, in a Dutch oven or large kettle, combine the soup, cream cheese, mushrooms, cream, butter, and garlic powder. Cook and stir over medium heat until blended.
- Reduce heat to low; add cheeses and stir until melted.
- Add chicken; heat through.
- Drain fettuccine; add to the chicken mixture.
- Transfer to a greased shallow 2 1/2 qt. baking dish.
- Combine topping ingredients; sprinkle over chicken mixture.
- Cover and bake at 350° for 30 minutes. Uncover, bake 5-10 minutes longer or until golden brown.
Yields 8 servings.
I saw this recipe in an article about Giada in the January 2007 issue of Redbook. She’s one of my favorite chefs to watch on the Food Network, and I own several of her cookbooks. Before watching her show, I had never tried Nutella, a chocolate hazelnut spread. Giada uses it in a lot of her dessert recipes. Since I finally tried it (and love it!), my eyes light up anytime I see a recipe that calls for Nutella or hazelnuts and chocolate. These cookies are really yummy, and I definitely love the addition of the toffee chips. She mentions in the article that she freezes hers, then microwaves them. I put about half of the cookies I made in the freezer. I can’t wait to come back to them in a month or so and see if they still taste as great as they did right out of the oven.
Chocolate Chip Hazelnut Cookies
From Redbook January 2008
- 1/2 cup old-fashioned (not instant) oats
- 2 1/4 cups all-purpose flour
- 1 tsp baking powder
- 1 tsp baking soda
- 1/2 tsp salt
- 1 cup (2 sticks) unsalted butter, at room temperature
- 1 cup light brown sugar, packed
- 1 cup granulated sugar
- 2 large eggs
- 1 tsp vanilla
- 4 oz English toffee candy (such as Heath or Skor bar), finely chopped
- 1 cup hazelnuts, toasted, husked, and chopped
- 1 (12 oz) bag semisweet chocolate chips
Instructions:
- Preheat oven to 325° F. Line 2 large, heavy baking sheets with parchment paper.
- Finely chop oats in food processor. Transfer oats to a medium bowl. Mix in flour, baking powder, baking soda, and salt. Set aside.
- Using an electric mixer, beat butter and sugars in a large bowl until fluffy. Beat in eggs and vanilla. Add oat mixture and stir until just blended. Stir in toffee pieces, hazelnuts, and chocolate chips.
- Drop dough onto baking sheets by rounded teaspoonfuls, 1 inch apart. Bake until cookies are golden, about 15 minutes. Cool cookies on baking sheets for 5 minutes, then transfer to a cooling rack.
Picky Apple Notes:
- I used the pre-chopped Heath toffee pieces you can find on the baking isle. I imagine chopping your own Skor or Heath bar would be delicious too since it would add more chocolate.
- I would definitely recommend using parchment paper, as recommended in the recipe. I just used some nonstick spray, but the cookies were difficult to get off the pan.
- I also did not finely chop the oats, but just threw them in as is. That seemed to work just fine.
- Lastly, the first batch I made thinned out a little more than I like, so I put the dough in the fridge for a while. That helped produce a thicker cookie.
After many weeks of exploring cooking, baking, and foodie blogs, I’ve decided to create my own blog to chronicle all of my cooking and baking experiments. I usually try 3 or 4 new recipes for dinner and bake at least one dessert a week. My husband, who is actually THE Picky Apple, is usually a good sport with all of my experiments.
After reading blog after blog about cupcakes, last night I made cupcakes from scratch for the first time ever. I decided to go with something basic for my first try, so I made Magnolia Bakery’s Vanilla Cupcakes with Vanilla Buttercream Frosting. My cupcakes were a little too dense, but still fairly tasty. It took me a while to get the frosting thick enough to frost the cupcakes and hold shape. Additionally, I think I would prefer chocolate or some other flavor frosting, as the vanilla cake with vanilla frosting is a little too plain for me. I’m still practicing my food photography (and photography in general)…
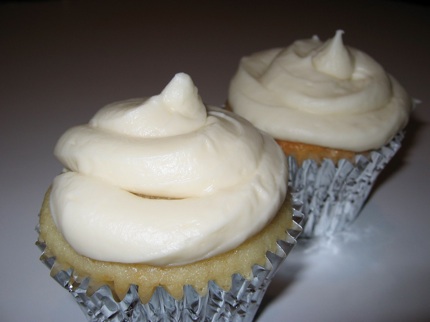
Magnolia’s Vanilla Cupcakes
Makes about 2 dozen cupcakes (depending on the size of your cupcake papers and muffin tins)
- 1 1/2 cups self-rising flour
- 1 1/4 cups all-purpose flour
- 1 cup (2 sticks) unsalted butter, softened
- 2 cups sugar
- 4 large eggs, at room temperature
- 1 cup milk
- 1 teaspoon vanilla extract
Instructions:
- Preheat oven to 350 degrees.
- Line two 12-cup muffin tins with cupcake papers.
- In a small bowl, combine the flours. Set aside.
- In a large bowl, on the medium speed of an electric mixer, cream the butter until smooth. Add the sugar gradually and beat until fluffy, about 3 minutes. Add the eggs, one at a time, beating well after each addition. Add the dry ingredients in three parts, alternating with the milk and vanilla. With each addition, beat until the ingredients are incorporated but do not overbeat. Using a rubber spatula, scrape down the batter in the bowl to make sure the ingredients are well blended. Carefully spoon the batter into the cupcake liners, filling them about three-quarters full. Bake for 20–25 minutes, or until a cake tester inserted in the center of the cupcake comes out clean.
- Cool the cupcakes in the tins for 15 minutes. Remove from the tins and cool completely on a wire rack before icing. At the bakery we ice the cupcakes with either Vanilla Buttercream or Chocolate Buttercream.
Adapted from More From Magnolia, by Allysa Torey.
Picky Apple Note: I only got 14 cupcakes out of this recipe.
Vanilla Buttercream Frosting
Makes enough for 2 dozen cupcakes.
- 1 cup (2 sticks) unsalted butter, softened
- 6 to 8 cups confectioners’ sugar
- 1/2 cup milk
- 2 teaspoons vanilla extract
Place the butter in a large mixing bowl. Add 4 cups of the sugar and then the milk and vanilla. On the medium speed of an electric mixer, beat until smooth and creamy, about 3-5 minutes. Gradually add the remaining sugar, 1 cup at a time, beating well after each addition (about 2 minutes), until the icing is thick enough to be of good spreading consistency. You may not need to add all of the sugar. If desired, add a few drops of food coloring and mix thoroughly. (Use and store the icing at room temperature because icing will set if chilled.) Icing can be stored in an airtight container for up to 3 days.
Picky Apple Note: I needed to add nearly 10 cups of confectioners’ sugar to get the frosting thick enough to pipe onto the cupcakes and hold its shape.
Adapted from More From Magnolia, by Allysa Torey

