Sep 6 10
by cara
at 6:22 AM

Apple Picks

I hope everyone is enjoying their Labor Day weekend!  We’ve been relaxing, watching college football (Hook ‘Em!), working on a few home projects, hanging out with family and gearing up for The Littlest Apple to start preschool on Wednesday.  Have a great Monday!  Here are my favorite links from this week…

Playroom Reveal @ Perfectly Imperfect

DIY Draft Dodger and Energy Efficiency @ Simple Organic

Practically Imperfect in Every Way: On NOT Doing It All @ Rockin’ Granola

Leaf Necklace Craft @ Frugal Family Fun Blog

Banana Streusel Snack Cake @ goodLife {eats}

Pan Fried Onion Dip @ Brown Eyed Baker

The Four Levels of Social Entrapment @ Hyperbole and a Half

Handprint Sunflowers @ The Crafty Crow

Pumpkin Inspiration @ The Stories of A to Z

Why We Are Addicted to Complaining and How to Stop It @ Steady Mom

What have you been up to this weekend?  Relaxing?  Working on any projects?

Sep 4 10
by cara
at 5:49 PM

Happy Birthday Banner

For The Littlest Apple’s third birthday, I created a Happy Birthday Banner (with a little help from a friend who has requested that her blog handle be “Ross Boss”).  I wanted to make something that could be used not just for The Littlest Apple, but for all future family birthday celebrations.

I love the bright colors of the paper I used!  This is the best picture I have of the whole banner.  We intended to trim the ribbon the left side but got distracted with other party prep.

Love the bright colors!

I used some scrapbook paper purchased about 3 years ago when I thought I would have time to make these amazing scrapbooks to document The Littlest Apple’s life.  3 years later, this is the first time I’ve used this paper.  (You can see more of this paper in the background of the photo in my Apple Pie Scented Playdough post).  LOVE it!

So, Ross Boss and I didn’t really measure anything.  We eyeballed all of it.

First we played “guess and print” until we found a font style and size we liked.  I think we wound up using Font Size 500.  Then we printed out all of the letters we would need.

At this point, we were having trouble figuring out how to get the letters traced onto the solid cardstock.  Ross Boss said “It’s too bad you don’t have one of those cool light table things, so we could just trace the letters onto the cardstock.” And a lightbulb went off in my head…we could use a window. It was pure genius, I tell ya.

Except that it didn’t quite work for the green cardstock.  For the green letters, I just taped the cardstock behind the paper with the letter and cut through both sheets simultaneously.

Next, we glued the white cardstock to the colorful scrapbook paper, then glued the letter on top, leaving room at the top of the cardstock for hole punches.  We used adhesive spray, which works great for projects like this (and I much prefer it to Mod Podge), but Ross Boss and I both learned the hard way that it is REALLY hard to get the spray adhesive off your hands.

I added a rectangle with stars made with a giant star punch to separate “happy” and “birthday.”  I intended to add some stars randomly to the rest of the banner, but didn’t quite get back to that.

Finally, I punched holes at the top a few inches apart (using a regular hole punch) then fed my blue ribbon through, trying to make it lay as flat as possible against the backdrop of the white cardstock.

Now that I’ve entered the world of paper crafts, I can’t wait to make something else with all of the beautiful scrapbook paper.  You know, something besides scrapbooks!

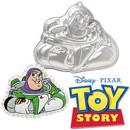
PS.  I also wanted to share a FAIL.  While Ross Boss was working on cutting out the letters for the Happy Birthday Banner, I was attempting to make a Buzz Lightyear Cake, using this cakepan…


Have you ever tried decorating a cake like this?  Well I hadn’t, until this.  I knew it would be tedious, but it was SO DIFFICULT!  I probably should have practice my technique first with a simpler design.  Also, the little insert with the directions and the photo to use as your guide is reversed from the way your cake actually looks.  A few days after this FAIL, I realized I could have rigged up a mirror or something so that the image “matched” what I was trying to decorate.  But my brain kind of imploded while I was trying to do this.  After my cake broke coming out of the pan, trying to smooth it out with frosting (which effectively removed all of the contours of the cake pan), I only got as far as the black outlines (which I kind of just made up as I went along) and filling a few areas before I threw in the towel.  It took me several hours to do that much, and I didn’t even get to the main part of piping in the rest of the colors.  Besides, that was just a practice cake…I was either going to have to do it all over again the night before the party or somehow freeze this cake for a week until the party.  Cake decorating is so NOT my thing.

Poor, deranged Buzz….

We went with hastily decorated cupcakes and cupcake toppers instead.  And they were just fine.

Have YOU ever made a banner?  Have YOU ever used a shaped cake pan like this? What was your experience like?


Sep 3 10
by admin
at 8:55 PM

Giveaway Winner

And the winner of the $25 gift card to the grocery store of your choice is…..

Staci

Congrats, Staci!  I’ll be emailing you shortly about your gift card.
Thanks again to everyone who entered the giveaway and to Food on the Table for sponsoring the giveaway!

I’ll be back tomorrow with a Birthday Banner tutorial.

Sep 2 10
by cara
at 4:29 PM

GI Update: Surgery Scheduled

First of all, don’t forget to enter the GIVEAWAY for the $25 grocery store gift card, if you haven’t already.  There’s still time!

In my last GI Update, I was agonizing over the decision to switch The Littlest Apple from NG tube to G tube.  We had our surgery consult last week at Texas Children’s.  Going in to the consult, I had decided that I was ready to schedule the surgery.  The Picky Apple hadn’t quite made up his mind and still had some questions about the G tube.  We really liked the surgeon.  She was reassuring and took the time to answer all of The Picky Apple’s questions, interacted well with The Littlest Apple.  She showed us an actual G tube button and demonstrated how it works.  She also had a baby doll with a G tube button for The Littlest Apple to play with.

We scheduled The Littlest Apple’s surgery for September 20th.  We tried to get it done sooner, but this surgeon was going to be out of town, and her colleagues would have required their own consult before scheduling it.

The timing isn’t that great.  The Littlest Apple starts preschool (3 days a week) on September 8th.  I hate that he has to start a new school with a new teacher and new kids with this NG tube (instead of the less conspicuous G tube), but that’s just how it has to be.  (I was asked to write a note home to all of the parents in the class explaining the NG tube so that parents could explain it to their kids….it would have been nice to avoid that!!)

And just as he’s settling in to the routine of school (and being away from mommy again…which I can tell he’s already anxious about), we’ll be pulling him out of school for surgery, spending two nights in the hospital, followed by at least a week of rest at home.

I really think this surgery is for the best, but it is going to cause some bumpy transitions at school and I’m really anxious to just get it over with.  I’m not looking forward to seeing The Littlest Apple in pain during recovery, but I know he will bounce back quickly.  We’ve been talking about the surgery lots with The Littlest Apple, and he seems to understand what is going to happen.

The Littlest Apple just moved to his big boy bed last weekend, and he’s exceeded my expectations about staying in bed.  But he does have LOTS more room to roll around (he’s a squirmy sleeper) at night when he’s connected to the feeding tube which has caused some tangling and more frequent pump alarm beeping.  The other morning I went in to find the tubing wrapped around his ankles about 4 times rather tightly….just the way you might rope a calf!  At least it was his feet, right?

Aug 31 10
by cara
at 1:22 PM

Menu Planning Resource and a GIVEAWAY!

I’ve mentioned many times how crucial menu planning is to making my week go smoothly.  But it does take time to sit down, look through my recipes, compare with the grocery store sale ads for the week, and check to see what I’ve got in the freezer.  Especially with a super active three year old that is constantly demanding my attention!

What if someone else took care of your menu plan for you?  Enter Food on The Table.  I had the opportunity recently to try out Food on the Table‘s menu planning service.  They didn’t ask me to write a review and I don’t normally review products for my blog.  However I think this service could be of great use to many of you!

Food on the Table is a menu planning service that is just the solution for busy moms like me.  This graphic below sums it up perfectly!


Here’s how Food on the Table works:

  • You select your grocery store.  Food on the Table then finds the current sales at your local grocery store, and you have the option of incorporating those items into your menu for the week.
  • You select your food preferences and what you’re in the mood for.  Have a craving for shrimp?  Select it here, and you’ll get a shrimp dish (or two!) as part of your weekly menu.
  • Then Food on the Table provides meal suggestions based on your grocery store sales, food preferences, and what is most important to you (quick recipes, cheap meals, etc).  At this point, you can use the suggested recipes or view some similar recipes to create your meal plan for the week.
  • Time for your grocery list!  Food on the Table generates a cumulative, printable grocery list for the week based on your menu plan.  You can review the list and delete things you already have on hand and add personal items.

Things I liked about Food on the Table:

  • Nutritional info for recipes is provided along with the serving size.
  • I love that you can personalize by grocery store sales and food preferences.  I usually only buy the meat that is on sale, and we’ve got picky eaters here, so this is perfect for me.
  • Tasty recipes!  All the recipes I tried were delicious!
  • Grocery lists keep the whole week in mind, and figure out the total amounts needed.
  • Easy to use website!

Things that need work:

  • I’d like to see fewer processed foods on the ingredients lists, but I am comfortable enough making substitutions that it’s a non-issue for me in most cases.
  • A way to exclude certain ingredients for allergies or special diets.  Luckily we don’t have food allergies anymore, but when my son was allergic to eggs and milk this would have been a helpful feature.

Overall, this is a great service for anyone who needs a little help planning their menus.  Not only are you getting your dinners planned, but you can save time and money at the grocery store and try delicious new recipes at the same time!  Head on over to the Food on the Table’s website to check it out.

Now for the GIVEAWAY!! The nice folks at Food on the Table have offered one of my readers a $25 gift card to the grocery store of your choice! (How cool is that?!  You get to pick the store!)

You can earn up to THREE entries:

(1)Please leave a comment answering the following question: What’s your biggest meal planning hurdle?

(2) Leave a separate comment after you subscribe to The Picky Apple’s RSS Feed or via email.  Or let me know that you already subscribe.

(3) Leave a separate comment after you join The Picky Apple on Facebook or let me know that you’re already a FB fan.

I’ll leave comments open until 12pm EST on Friday, September, 3.  The winner will be selected randomly and announced on Friday evening.

Disclaimer: I was provided with a free 30-day trial of Food on the Table’s premium service, but they did not require me to write this review.

Aug 30 10
by cara
at 3:03 PM

Three!

Dear Littlest Apple,

You turn THREE tomorrow!  I can’t believe how much you’ve changed in the last year.  So, so much has happened!

You’re potty trained.

You can recognize all of your letters and know what sounds they make.

You’ve had a vocabulary explosion, and almost everyone can understand what you say.

You already have an entire year of Mother’s Day Out under your belt.

You’re gaining weight!

You’ve got even more energy than you had before.  Your energy just blows me away some days.

You ask LOTS of questions.

You love Curious George and Buzz Lightyear.

I am so thankful to have you in my life.  After all we’ve been through, I know what a miracle it is that you’re here.  You brighten our days with your exuberance, your sweet spirit, your sense of humor, and your vivid imagination.  You challenge me to be a better parent and a better person.  I am so proud to be your mom.  I love you so so much!

Love,

Mommy

Aug 29 10
by admin
at 9:21 PM

Apple Picks: Weekend Links

I’m late with my Apple Picks this weekend, but better late than never right?  (A little disclaimer…I’ve got 947 unread blog posts in my Google Reader.  I KNOW I need to just click “Mark All As Read”, but what if I miss out on a great post like one of the posts below?!)

Blueberry Caramel and White Chocolate Oatmeal Cookies @ Picky Palate

Faux-Wallpaper Walls @ k.f.d. designs

Bean Art @ New Nostalgia

Cowboy Candy @ The Weekly Bite

Halloween Trick or Treat Wreath @ Craft-o-Maniac

A Lesson Learned: Each Word is  a Gift @ I Can Teach My Child!

Goal Setting Charts for Young Kids @ Simple Kids

Homemade Cinnamon Bread @ The Pioneer Woman

Aug 27 10
by cara
at 9:11 PM

Apple Sensory Bin

To go along with our Apple Pie Scented Playdough, I created this Apple Sensory Bin after seeing one on No Time For Flashcards.  Our Apple Sensory Bin contains fake red apples, pinto beans, black beans (which look like apple seeds, don’t you think?  That was my intention anyway!), pine cones and corks.  I would also like to add acorns like the bin on No Time for Flashcards, but I didn’t want to buy them and didn’t find any outside near our oak tree.

The Littlest Apple has thoroughly enjoyed playing with this bin.  He likes to transfer the apples from the bin to a bowl using tongs, and scoops the beans, stirs the beans….okay, and throws the beans too.

This morning I got out the sensory tub for a playdate.  This was the first time I’ve done that, and it kept the boys busy for quite a while.  They sat facing each other on a quilt on opposite sides of the bin with bowls, tongs, and scoops.  This turned out to be a really great playdate activity (especially when there are just 2 kids).  I LOVE sensory bins!

Aug 24 10
by admin
at 9:45 PM

Homemade Butter

Have you ever tried making your own butter?  If not you should!  It is SO easy and takes only about 10 or 15 minutes (assuming you have a stand mixer).  I can hear you asking “WHY should I make my own butter when I can just buy it at the store?”.  Here are 5 reasons why:

1.  Homemade butter tastes better than any store-bought butter

2.  You can use less salt than store bought butter

3.  You can add fun seasonings, like cinnamon, honey, garlic, cilantro, rosemary

4.  It’s a neat process to observe and share with your kids (or your spouse)

5.  It’s FUN!

Let’s get started!  All you need is a quart of whipping cream and your stand mixer with the whisk attachment (and whatever add-ins you may want).

Add the cream to your stand mixer, and mix on medium low (to prevent splashing) for about 5 minutes.  As the cream thickens, turns the speed up to medium high.

As the cream thickens it should start to form soft peaks (the stage you would stop at if folding in to baked goods).  This is a good time to stop the mixer and scrape down the sides of the bowl.

Continue to mix on medium high or high.  The cream should quickly reach the stiff peaks stage, when the cream stands up in peaks without falling down.  (If you’ve made whipped cream before, this is where you stop and add sugar and/or vanilla extract.)  Stop the mixer, and scrape down the sides of the bowl again.

Keep mixing on medium high speed.  Now the cream will begin to look “curdled” and seize up.  It will also start to look light yellow.  This is the beginning of the butter’s “ugly duckling” phase.  Keep going!

As more liquid appears (this is buttermilk!) you should turn down the mixer to medium-low or low to keep it from splashing and mix for a few more minutes.

Now it is time to separate the buttermilk from the butter.  Transfer the butter to a bowl, squeezing out as much buttermilk as you can.  You can save this buttermilk to bake with in recipes like Blueberry Crumb Cake or Buttermilk Pancakes.  It’s not going to taste exactly like store bought buttermilk (which I never buy anyway!), but you can add a little bit of lemon juice or vinegar to it and it will work just fine.

Time to wash the butter!  Add cold water to the bowl of butter, and knead the butter.  When the water turns cloudy, pour out the water and repeat the kneading process.  You’ll need to do this about 5 times, or until the water stays clear as you knead the butter.

To make the butter lighter and smoother, put it back in the mixer for a few more minutes on medium speed.  This is when you should add the salt or any other seasonings, and mix well.

The butter can be stored in the refrigerator for 1-2 weeks….if you don’t eat it all first!  Tastes delicious with homemade bread!

Have YOU ever made your own butter?

Aug 23 10
by cara
at 4:53 PM

Apple Pie Scented Playdough

I haven’t made any playdough in a while, and since it is back-to-school time, I thought this one would be just perfect!  (And obviously, anything apple related is perfect for my family!)  This is very similar to the Pumpkin Spice Scented Playdough that I made last fall, but this one is red and uses Apple Pie Spice instead of Pumpkin Pie Spice.  You can either purchase Apple Pie Spice or use the spices listed below as I did.

This playdough would be perfect to go along with all of those apple crafts I’m seeing on all the blogs right now!  I’ve got an apple-themed sensory bin (inspired by No Time For Flashcards) coming soon!

Apple Pie Scented Playdough

Ingredients:

  • 1 cup flour
  • 1/2 cup salt (use iodized, not kosher for smoother dough)
  • 1 Tablespoon olive oil
  • 1 Tablespoon cream of tartar
  • 1 cup water
  • Red food coloring (I use the Wilton gel colors)
  • 1/2 teaspoon ground cinnamon
  • 1/4 teaspoon ground nutmeg
  • 1/8 teaspoon ground allspice
  • 1/8 teaspoon ground cardamom

Stir ingredients together well in pot.  Over medium heat cook the dough, stirring constantly until it forms a ball.  Turn dough onto a board (or the countertop) and knead until very smooth.  Cool.  Store in a covered plastic container.

If I was really on-the-ball, I would have given The Littlest Apple an apple shaped cookie cutter.  Need to get one of those!  For now, we’re using our fall leaves, some cinnamon sticks, popsicle sticks, and a rolling pin.

I’m sharing this post with:

Blog Widget by LinkWithin