Feb 27 08
by cara
at 8:30 AM

Mediterranean Chicken Fettuccine

Whenever I come across a recipe in a magazine, I tear out the page, and place it in a “Recipes To Try” binder, organized by Chicken, Beef, Dessert, Breakfast, and Other.  The categories probably need a little more refining, but that worked at the time I made my binder about 4 years ago.  My Recipes to Try binder is getting way too full as I keep adding, adding, adding, and not making very many of the recipes, relying instead on the internet, Food Network, or old standbys.  This week when doing my menu planning, I made a conscious effort to select a few recipes from the binder.  This Mediterranean Chicken Fettuccine from Taste of Home sounded good, and the addition of olives and feta at the end was especially appealing to me.  It smelled wonderful while it was cooking, as dishes with garlic and wine typically do.  My husband, ever The Picky Apple, opted not to add the feta and olives to his, and he isn’t really big on dishes with wine.  But he ate it, liked it, and seemed willing enough to eat it again in the future (but probably wouldn’t request it).  I liked it enough to move this recipe to my Keepers file and share it with you.

mediterranean-chicken-fettuccine.jpg

Mediterranean Chicken Fettuccine

adapted from Taste of Home Brand Name Cookbook, Spring 2008

Makes 6 servings.

Ingredients:

  •  6 boneless, skinless chicken breasts
  • 1 tablespoon olive oil
  • 1 cup chopped onion
  • 1 cup chopped celery
  • 3 garlic cloves, minced
  • 1 can (28 ounces) crushed tomatoes, undrained
  • 1 cup Pinot Noir
  • 2 teaspoons dried oregano
  • 2 teaspoons dried basil
  • 1 teaspoon sugar
  • 1/2 teaspoon pepper
  • 1/4 teaspoon salt
  • 2 bay leaves
  • 8 ounces fettuccine
  • 1 cup (4 ounces) crumbled feta cheese
  • 1/4 cup sliced stuffed green olives

Directions:

In a large nonstick skillet, brown chicken in oil.  Remove and keep warm.  In the same skillet, saute onion, celery and garlic until tender.  Add tomatoes, wine, oregano, basil, sugar, pepper, salt, bay leaves and chicken; bring to a boil.  Reduce heat; cover and simmer chicken mixture for 25-30 minutes, stirring occasionally.

Meanwhile, cook fettuccine according to package directions.  Uncover chicken mixture; simmer 10 minutes longer or until chicken juices run clear.  Discard bay leaves.  Drain fettuccine;top with chicken and sauce.  Sprinkle with feta cheese and olives.

Feb 22 08
by cara
at 11:07 PM

Strawberry Margarita Cupcakes

Since I live in Houston, it is only fitting that I love Tex-Mex.  Love love love it!  Cheese enchiladas, sizzling beef and chicken fajitas, tortilla chips, salsa, guacamole, queso, lime, cilantro, fresh flour tortillas….yum!  There are so many restaurant options here for Tex-Mex, so we usually make our decision based on what kind of dinner we want.  We have a certain place to go for cheese enchiladas (Chuy’s).  A different restaurant for fajitas (Lupe Tortilla).  I have a favorite place for chips and sauce (Los Cucos-love that green sauce).  A restaurant nearby (La Finca) for the fastest service and decent all around food (crucial now with The Littlest Apple).

Whenever we go out for Tex-Mex, I always order strawberry margaritas.  It is my absolute favorite drink, so the quality of the strawberry margarita is yet another consideration when we’re deciding on our Tex-Mex dining destination.  I’ve had some strawberry margaritas that were so bad I barely drank any of it, and I’ve had some that were so delicious I wanted to keep drinking and drinking and drinking them until I couldn’t stand up (Chuy’s, Cafe Adobe).  Um, not that I ever did that.  Nope.  Not me….hi Mom and Dad!

Part of the reason I started my blog was to participate in all of the great events.  Laurie of Quirky Cupcake hosts a monthly event called Cupcake Hero with a different theme ingredient each month.  When I saw that the theme for this month’s Cupcake Hero event was liquor, I immediately thought of my favorite drink, the strawberry margarita.  After doing some research, it seemed that strawberry margarita cupcakes are a little played out in the food blog world.  I got a little deflated and thought about other drinks I might make into a cupcake.  But I kept coming back to that strawberry margarita.  I just couldn’t shake the idea of a strawberry margarita cupcake, and besides, they’re new to me.  I was inspired most of all by this recipe for Cherry Limeade cupcakes over at Oooh, You Tasty Little Things because of the use of limeade concentrate, which is exactly what we use when we’re making margaritas at home.  I’m not a big fan of the pre-fab margarita mixes.  In addition to limeade concentrate, I also used some strawberry preserves that I made last week in my continuing quest for the perfect strawberry cupcake.  And of course, the star of the show, tequila!  The cupcakes sure did smell like a booze fest before they went in the oven, but I actually think I may have gone a little too light on the tequila in retrospect.  Or maybe the tequila is just overshadowed by the tartness from all of the lime.  Regardless, they turned out decent, though the buttercream wasn’t as smooth as usual.  I had so much fun throwing this together, and I can’t wait to see all of the other drink-inspired cupcakes!

strawberry-margarita-cupcakes.jpg

Strawberry Margarita Cupcakes

Makes approximately 22 cupcakes.

Cupcake Ingredients:

  • 3 cups cake flour
  • 1/2 tsp salt
  • 1 tsp baking powder
  • 1/2 tsp baking soda
  • 1 cup (2 sticks) butter
  • 1 cup sugar
  • 1/2 cup + 2 tablespoons limeade concentrate
  • 3 eggs
  • 1/2 cup milk
  • 1/3 cup tequila
  • 5 tbsp strawberry preserves

Margarita Glaze:

  • 3/4 cup limeade concentrate
  • 1/2 cup powdered sugar
  • 2 tbsp tequila

Strawberry Margarita Buttercream:

  • 1 pound powdered sugar
  • 1/2 cup butter, softened
  • 4 tbsp limeade concentrate
  • 2 tbsp tequila
  • 3 tbsp strawberry preserves
  • Red food coloring

Directions:

Preheat oven to 350 degrees Fahrenheit.

Mix together the flour, salt, baking soda and powder and set aside. In a medium sized bowl, cream the butter until smooth then add the sugar and cream together. Once the butter and sugar are creamed add in the limeade concentrate, strawberry preserves, and 1/3 cup tequila. Mix in one egg at a time. Add in flour mixture 1/3 at a time. When flour is thoroughly mixed, mix in the milk. Batter will be slightly lumpy. Divide the batter evenly into lined muffin tins and bake for about 20 minutes. Allow to cool.

Once the cupcakes have cooled, poke holes in the top of the cupcake, not quite to the bottom of the cake. Make the glaze by mixing together 3/4 cup of the limeade concentrate with about 1/2 cup powdered sugar and 2 tbsp tequila.  Whisk the mixture well, so there aren’t any lumps. Pour about a tablespoon of the syrup over the holes in each cupcake, slowly, so that the syrup absorbs into the cake.
For the buttercream: Cream together butter, powdered sugar, limeade, tequila, and strawberry preserves until smooth.  Add drops of red food coloring until frosting is desired shade of pink.

Refrigerate cupcakes.

Feb 21 08
by cara
at 3:49 PM

Sun-dried Tomato Chicken Roll-ups

I really like sun-dried tomatoes and surprisingly, The Picky Apple does too.  I gravitate toward dishes containing sun-dried tomatoes in restaurants, but always forget that I could be cooking with them at home.  When I saw this recipe for Sun-dried Tomato Chicken Roll-ups back in January on Celeste’s blog, Sugar & Spice, I knew I wanted to try it.  Well, last night I finally got around to cooking it, and it is a keeper!  Essentially, it is breaded chicken cutlets rolled with ricotta, sun-dried tomatoes, and provolone, drizzled with olive oil.  I served mine with penne pasta tossed with garlic and parmesan.  Head on over to Sugar & Spice for the recipe, and a much more appetizing photo of the dish.  Thanks, Celeste!

sun-dried-tomato-chicken-roll-ups.jpg

Feb 21 08
by cara
at 11:16 AM

Heart of Darkness Brownies

My husband (Picky Apple) surprised me on Valentine’s Day with two new cookbooks.  It was really the perfect gift, as I keep adding cookbooks to my Amazon cart for “pretend” orders.  (Do you do that with online shopping, or is it just me?  Add all the things you want to your cart, just for fun….then never order it?  Or order some of it?  Or order all of it, and get in trouble, because you went a little overboard?  Maybe it is just me.)    Anyway, the cookbooks: I’ve already got lots of recipes I can’t wait to try.  This brownie recipe comes from Sticky, Chewy, Messy Gooey, by Jill O’Connor.  It is actually the very first recipe in the book, and I’m tempted to just cook my way through this cookbook, recipe by recipe.  They all look so yummy!  This recipe in particular caught my eye because, like the Banana Crunch Muffins I make, they are packed with extra add-ins.  In fact, they are so Sticky, Chewy, Messy Gooey that they must be cooked in muffin tins so you don’t have to deal with cutting up the brownies.  These are definitely the Ben & Jerry’s of the brownie world.  They’ve got chocolate chips, Snickers, marshmallows, caramel, and toasted pecans.  I made half with pecans and half without, as requested by The Picky Apple himself.  I had really high hopes for these brownies, because I love brownies and love all the components. Chocolate?  Good.  Pecans?  Good.  Snickers?  Good.  Marshmallow?  Good.  Caramel?  Good.  Think Joey from Friends, here (I think from the episode when Rachel made the trifle with meat in it)  You get the picture.  I’m not sure if it is because I wasn’t feeling that great when they finally came out of the oven or what, but they almost seem TOO rich.  And that’s something I never ever say, nor ever dreamed possible.  The Picky Apple agreed, and thinks they might be better sans marshmallow at the very least.  (UPDATED 2/22/08: I tasted the brownies again today, and I think they taste great!  Not too rich at all.  I think I was just having some pre-migrane sensitivities when I was finishing up the brownies the other night…my vision and hearing always get extra-sensitive right before and during a migrane, and apparently my tastebuds were also affected this time.  Bleh to migranes.)

heart-of-darkness-brownies.jpg

Heart of Darkness Brownies

Makes 24 brownie cups

Ingredients:

  • 1 1/2 cups (3 sticks) unsalted butter
  • 6 ounces unsweetened chocolate
  • 2 1/4 cups granulated sugar
  • 1 cup firmly packed light brown sugar
  • 6 large eggs, lightly beaten
  • 1 tablespoon pure vanilla extract
  • 1 1/2 cups all purpose flour
  • 1/2 teaspoon salt
  • 1 cup very coarsely chopped raw almonds or pecans, toasted
  •  1 cup semisweet chocolate chips
  • 5 full-size (2.07 ounces each) Snickers Candy Bars, cut into small chunks
  • 3 cups mini marshmallows

For the Caramel Drizzle:

  • 6 ounces (about 25) unwrapped caramel candies
  • 2 tablespoons heavy cream
  • 1 teaspoon pure vanilla extract
  • pinch of salt

Directions:

Position a rack in the middle of the oven and preheat to 350 degrees F.  Spray two standard 12-cup muffin tins with nonstick cooking spray.

Melt the butter and unsweetened chocolate together in a small saucepan over medium-low heat and stir until smooth.  Pour the chocolate mixture into a bowl and stir in the sugars, eggs and vanilla.  Sift the flour and salt into the chocolate mixture and stir just until combined.  Stir in the cooled chopped nuts, chocolate chips, and chunks of candy bar.

Fill each cupcake cup halfway with batter.  Bake until the surface of the brownies has a glossy, crackled surface, about 20 minutes.  Remove the brownies from the oven and top each one with 1/4 cup of the mini marshmallows.  Return the brownies to the oven and cook until the marshmallows start the melt and puff up a bit, but not browned too much, about 2 minutes.  Transfer to a wire rack to cool just enough to handle, then remove from the cupcake cups, running a knife around the edge of each brownie to loosen it from the cup.  Let cool completely on the wire rack.

While the brownies are cooling, make the caramel drizzle.  Combine the caramels, cream, vanilla, and salt in a microwave-safe bowl.  Microwave, uncovered, on high for 1 minute.  Remove from the microwave and stir until smooth.  If the caramels are not completely melted, continue heating in 30-second increments, stirring until smooth.

Drizzle the brownies with melted caramel and let cool completely for the caramel to harden.  Do not chill.  Serve immediately or store for up to 3 days in a covered container.

Feb 20 08
by cara
at 10:57 PM

Spaghetti and Meatballs with Homemade Red Sauce

Spaghetti and meatballs is one of my favorite comfort foods.  Considering how much I love it at home, I should really think about ordering it more often when dining out at Italian restaurants.  I tend to overlook spaghetti and meatballs in favor of a more “exciting” dish, but maybe I’ll give it a chance next time.  When I make meatballs at home, I always make extra, and then we use the leftover meatballs to make meatball subs on hoagies with provolone or mozzarella cheese.  You can also assemble the meatballs (without baking them) and freeze them for future use.  I feel like once you’re on a roll assembling the meatballs, and you’re already up to your wrists in ground meat, you might as well make more so you don’t have to mess with it next time.  I serve the meatballs with my homemade red sauce.  Making your own sauce is not that much work, and my recipe makes lots of sauce.  It is easily divided into smaller containers and frozen for future use.

spaghetti-and-meatballs.jpg

Meatballs

adapted from Betty Crocker Cookbook

4 Servings

Ingredients:

  • 1 pound lean ground beef
  • 1/2 cup dry bread crumbs
  • 1/4 cup milk
  • 1/2 teaspoon salt
  • 1/2 teaspoon Worcestershire sauce
  • 1/4 teaspoon pepper
  • 1 large egg
  • 1/4 teaspoon garlic salt
  • 1/4 teaspoon garlic powder
  • 1/8 teaspoon onion powder

Directions: Heat oven to 400 degrees F.  Mix all ingredients.  Shape mixture into sixteen 2 inch meatballs.  Place in ungreased rectangular pan, 13 x 9 x 2 inches, or on rack in broiler pan.  Bake uncovered 20 to 25 minutes or until no longer pink in center.

Homemade Red Sauce

Ingredients:

  • 1 tablespoon olive oil
  • 8 cloves garlic, finely chopped
  • 1 (28 ounce) can tomato puree
  • 1 (28 ounce) can crushed tomato with basil
  • 1 (28 ounce) can tomato sauce
  • 1 (6 ounce) can of tomato paste, Italian style
  • 1 bay leaf
  • 2 teaspoons dried oregano
  • 1 teaspoon dried basil
  • 1/2 teaspoon black pepper
  • 1/2 teaspoon red chili flakes
  • 1 cup Romano cheese

Directions:  In a large saucepan, lightly saute garlic in olive oil at medium heat, 2 -3 minutes.  Place remaining ingredients in saucepan, bring to a gentle boil.  Simmer at least 30 minutes, but if you’ve got the time, the longer, the better.  Stir frequently.

Feb 15 08
by cara
at 10:19 PM

Valentine’s Dinner

The Picky Apple and I are not the type to go out to dinner for Valentine’s.  In fact, we normally don’t really celebrate at all, which is a little strange considering that Valentine’s day is also the “anniversary” of our very first date.  That’s right.  Our first date was on Valentine’s Day.  Ten years ago, when I was a freshman in college and The Picky Apple was a sophomore, I asked The Picky Apple out to dinner for Valentine’s day.  Up until then, we’d just been friends, but I developed a crush on him.  I wasn’t sure if he liked me or not, so I just mentioned a casual dinner at Bennigan’s.  (Not very crowded on Valentine’s Day)  I never mentioned the word “date” in this conversation.  When I showed up at his apartment that night, two of his roommates were sitting on the couch dressed and looking ready to head out the door, one of them tying his shoes.  My initial thought was that The Picky Apple misread my invitation, and invited his roommates (who are my friends too) along for dinner.  Luckily, they were headed somewhere else, and so off we went on our very first date.  It really doesn’t seem like it has been ten years already, but here we are…

So in honor of this anniversary of sorts, I wanted to make more of an effort to have a nice Valentine’s Day and cook a quasi-special meal.  It definitely wasn’t the most creative menu, but I wanted to cook a few things that I knew The Picky Apple would eat….not too many experimental or new dishes for this special night.  We put The Littlest Apple to bed, and I brought out the china that we only use about once a year, as well as candles and music.  Our menu consisted of:

valentines-dinner.jpg

Here’s a brief rundown of each item….

Grilled Pork Tenderloin with Roasted Raspberry Chipotle: I know I just cooked the pork tenderloin dish a few weeks ago, but The Picky Apple really likes it, so i figured I’d play it safe.

Roasted asparagus is an easy, beautiful side dish.  I just spread out the asparagus on a baking sheet and drizzled with olive oil, kosher salt, and pepper.  Baked at 325 F for 15 minutes.

The Hasselback potatoes are something we saw prepared on the Food Network late last year and thought they looked good.  They turned out great, but took a looooooong time to cook, and were somewhat “needy.”  It takes some fancy knife skills to make all of the required slices in the potato without slicing all the way through.  I clearly lack these skills.  Additionally, for the first 30 minutes, you’re supposed to be basting the potatoes every 5 minutes with a chicken stock and butter mixture.  Well, The Littlest Apple is “needy” too, particularly so while I was preparing this dinner, so the potatoes didn’t get all the basting called for in the recipe.  I maybe did it 2 or 3 times, but luckily, they were still plenty tasty.  Recipe below.

Strawberry Cupcakes with Strawberry Frosting:  For as long as I’ve been with my husband, he’s requested a strawberry cake with strawberry frosting for his birthday.  The box kind.  (Some of us refer to this as the Barbie/Princess cake, but it hasn’t deterred him from requesting it year after year.  He’s secure in his manhood, I suppose.)  Since I enjoy baking so much, I’m a little hesitant to use box mixes.  I guess I’m a little bit of a cake snob, but so far I’ve just played along and made the box kind for him.  Recently I’ve been on a cake/cupcake kick, and The Picky Apple specifically requested strawberry cupcakes.  This was my first attempt at strawberry cupcakes, and it definitely wasn’t successful so I won’t post the recipe.  They tasted more muffin-y than cake-y, and just weren’t what we wanted.  Therefore, the search for the perfect strawberry cake/cupcake continues.  Let me know if any of you have a good recipe.  I’ve got another one that I may post about in a few days if it turns out decent.

Last but not least, the wine.  Banfi Rosa Regale 2007.  I am not a big wine drinker normally, but I love sparkling wines, particularly those that are slightly sweet.  When I saw the display in the store with this sparkling, sweet red wine, I knew I wanted to try it.  The wine was good, but I only had one (or one and a half) champagne flutes of it (nursing mother, and all that).  It was so good that I made a note last night of exactly what it was so I could buy it again.  And then I woke up this morning.  I woke up at 5 am with a pounding headache and vomiting.  It definitely felt like a hangover, but how could a measly glass do such damage?  I haven’t had much to drink lately (pregnancy and now nursing my son), but I had two margaritas last Saturday night for Girls Night Out and no ill effects.  The tannins maybe?  I’ve never had a problem with red wine before.  Maybe I’m getting sick?  Let’s hope not.  Besides, I’m feeling better now.  Whatever it was, it was a rude awakening for the morning after Valentine’s Day.

hasselback-potatoes.jpg

Hasselback Potatoes

from Emeril Lagasse, via The Food Network

Ingredients:

  • 2 small baking potatoes, about 3/4-pound total
  • 2 tablespoons melted butter
  • 1/3 cup chicken stock
  • 1/4 teaspoon chopped fresh thyme leaves
  • 1/2 teaspoon salt
  • 1/4 teaspoon freshly ground white pepper
  • 1 1/2 tablespoons finely grated hard cheese, such as Parmesan
  • 1 tablespoon fine dry bread crumbs  

Directions:  Preheat the oven to 425 degrees.  Peel potatoes. Cut each potato not quite through in a series of crosswise slices about 1/4-inch apart or closer so that they are still joined together at the bottom. Brush the potatoes with the melted butter and place in a small baking pan. Pour the chicken stock around the potatoes and sprinkle with the thyme leaves. Sprinkle with salt and pepper and roast until the potatoes are half cooked, 25 to 30 minutes, basting every 5 minutes with the butter-chicken stock mixture.

In a small bowl combine the grated cheese and bread crumbs and divide the mixture evenly between the tops of the 2 potatoes. Continue roasting without any further basting until the potatoes are crispy on the outside and cooked through, about 30 minutes.

*Note: Exact cooking time will depend on the size of the potatoes.

Feb 12 08
by cara
at 9:21 PM

Chicken and Prosciutto Pasta

Remember the other day when I told you about Paula Deen’s recipe for Savory Baked Chicken, and how you were supposed to save the leftover chicken so you could use it again in another recipe?  Well this is the other recipe.  Hopefully you didn’t eat all of that leftover chicken (good as it was) because this recipe for Chicken and Prosciutto Pasta is good too, and I know you’ll want to try it.  I reluctantly left out the mushrooms because The Picky Apple doesn’t like them, but really, how hard is it to pick out mushrooms? Next time he’s on his own because I think the mushrooms would be yummy.  In the future I’ll probably throw in some sun-dried tomatoes, red peppers, and/or asparagus too.  The Picky Apple would actually eat those things, believe it or not.  I’d also leave out the salt next time, because there’s plenty of salt in the prosciutto and romano cheese.  All my pictures turned out blurry, so you’ll just have to imagine how tasty it looks…or try the recipe ASAP.

Chicken and Prosciutto Pasta

from the March/April 2008 issue of Cooking with Paula Deen magazine

Makes 4 to 6 servings

Ingredients:

  • 2 tablespoons olive oil
  • 4 cloves garlic, minced
  • 1 (8 ounce) package sliced fresh mushrooms
  •  4 ounces thinly sliced prosciutto, chopped
  • 3 cups heavy whipping cream
  • 3 cups chopped cooked chicken (leftover from Savory Baked Chicken)
  • 1/4 cup shredded Romano cheese
  • 3/4 teaspoon salt
  • 1/2 teaspoon crushed dried rosemary
  • 1/2 teaspoon dried oregano leaves
  • 1/2 teaspoon dried thyme leaves
  • 8 ounces Florentine fettucini, cooked and kept warm
  • Chopped tomato and grated Romano cheese (optional)

Directions: In a large skillet, heat olive oil over medium heat.  Add garlic and mushrooms, and cook 5 minutes, stirring occasionally.  Add prosciutto, and cook 5 minutes, stirring occasionally, until crispy.  Stir in cream, reduce heat, and simmer 12 minutes, or until thickened.  Stir in chicken, cheese, salt, rosemary, oregano, and thyme, and cook 5 to 10 minutes, or until thoroughly heated.  Serve over cooked pasta.  Garnish with chopped tomato and Romano cheese, if desired.

Feb 11 08
by cara
at 6:04 PM

Apple Fritters

Whenever The Picky Apple gets doughnuts (or donuts, however you spell it), I always request an apple fritter.  Plain glazed donuts are great (and obviously the favorite choice of The Picky Apple, because they’re the plainest donut of all), chocolate glazed donuts are even better, but my favorite donut is the apple fritter.  Crunchy, sweet, and melt-in-your mouth on the outside, cinnamon-y dough with apple chunks on the inside.  At least, that’s the way they are made at Shipley’s, our favorite donut shop.

When I saw that Peabody and Tartelette were hosting Time to Make the Doughnuts, I knew I wanted to participate.  I briefly considered making beignets, having just had Mardi Gras and New Orleans on the brain.  As I mentioned in my King Cake post, I used to live in Louisiana, and whenever we went to New Orleans, we always had beignets at Cafe Du Monde at least once or twice during our stay.  Ah, the smell of fried dough and coffee in the air, the tables and chairs slightly sticky from all the powdered sugar.  I’ve made beignets once or twice before.  Beignets are delicious and fairly simple to make, but I’ve been craving apple fritters.  Besides, I’ve never made apple fritters, and there’s something really satisfying about trying/creating a new recipe that turns out well, don’t you think?   Notice how I said it’s satisfying when it turns out well.

My foray into the world of apple fritters seemed doomed from the get-go.  I had lots of trouble finding a recipe.  Many apple fritter recipes I ran across were for fried apple slices, which I’m sure are great, but not what I had in mind.  After finding a few recipes that were close to what I was looking for, I decided to do my own thing.

The key to any good donut is lots of hot oil because after all, donuts are fried dough.  I was low on oil, so decided to substitute Crisco.  Substitutions already?  That should be your first clue that things are about to go horribly wrong.  But how bad could it be?  Besides, the Crisco was butter flavored, so that should taste good, right?  Right?  WRONG.  Very very very wrong.  The first batch of apple fritters were overwhelmed by the yucky taste of artificial butter.  And they were too salty.  And the texture wasn’t quite right.  And the powdered sugar coating didn’t stick because I waited too long.  Need I go on?  All in all, disastrous.  The Picky Apple took one bite of his, and promptly spit it out and threw the rest in the trash.  I tried so hard to like them, thought maybe they would grow on me, but they did not.  I decided maybe it wasn’t meant to be….

But all weekend, I kept thinking about apple fritters, reading other entries in the doughnut event, and decided to give it one more try this afternoon with the event deadline looming.  I couldn’t stand being defeated by the apple fritters.  For my second attempt, I used oil and changed up my recipe a little.  This batch turned out much better  (because really, they couldn’t get much worse than that first batch!).   They still weren’t as good as the apple fritters from Shipley’s….not even close.  But they were decent, and I’m glad I attempted donuts for this event.

apple-fritters.jpg

Apple Fritters

Fritter:

  • 1 cup all purpose flour
  • 1/4 cup sugar
  • 3/4 teaspoon salt
  • 1 1/2 teaspoons baking powder
  • 1 teaspoon cinnamon
  • 1/3 cup milk
  • 1 egg
  • 1 cup chopped apple

Glaze:

  • 2 cups powdered sugar
  • 1 1/2 tablespoons milk

Directions:   Combine flour, sugar, salt, baking powder, cinnamon.  Stir in milk and egg until just combined.  Fold in apple.  Pour oil into skillet so that it is approximately 1 1/2 deep.  Heat oil on high.  Oil is ready when dough floats to top.  Carefully add dough to oil in heaping teaspoons.  Cook until brown, about 2 minutes, then flip.  Cook another 1-2 minutes, until both sides are browned.  Transfer briefly to paper towels to absorb excess oil, then transfer to cooling rack.  Make glaze by stirring milk and powdered sugar together in a small bowl.  Drizzle over apple fritters.  Wait approximately 3 minutes for glaze to harden, then flip fritters and drizzle glaze over the other side.  Best served warm.

Feb 10 08
by cara
at 9:53 PM

Savory Baked Chicken

Paula Deen is one of my favorite celebrity chefs on The Food Network.  I have several of her cookbooks and have subscribed to her magazine since its inception about 2 years ago.  I always find a handful of recipes to try from each issue of the magazine, and the March/April 2008 issue is no exception.  This Savory Baked Chicken caught my eye since it is a simple marinade containing butter (naturally, being one of Paula’s recipes), lemon juice and rosemary.  This is Part One in a series of recipes.  Once you make this chicken, Paula provides several more recipes that use the leftover chicken for some quick weeknight meals.  I’ll be trying one of the other recipes later this week.  This chicken turned out moist and flavorful on its own, and I’m looking forward to trying the other recipes in the series.

savory-baked-chicken.jpg

 Savory Baked Chicken

from the March/April 2008 issue of Cooking with Paula Deen magazine

Makes 10 chicken breasts

Ingredients:

  •  1/2 cup olive oil
  • 1/2 cup butter,melted
  • 3 tablespoons fresh lemon juice
  • 1 tablespoon dried oregano
  • 1 teaspoon garlic salt
  • 1 teaspoon dried crushed rosemary
  • 1 teaspoon ground black pepper
  • 10 split chicken breasts (about 7 pounds)  (I used one package of chicken tenders (about 2 1/2 pounds))

Directions:

In large resealable plastic bag, combine olive oil and next 6 ingredients; add chicken.  Seal bag and chill 1 hour, turning occasionally.  Preheat oven to 375 degrees F.  Remove chicken from marinade, discarding marinade.  Place chicken, skin side up, on a large rimmed baking sheet.  Bake 45 to 55 minutes, or until done.  Serve 5 chicken breasts.  Let remaining chicken cool 30 minutes.  Remove and discard bones and skin.  Chop; cover, and store in refrigerator up to 3 days.  Freeze in airtight containers up to 3 months.

Feb 10 08
by cara
at 9:27 PM

Inside-Out German Chocolate Cake

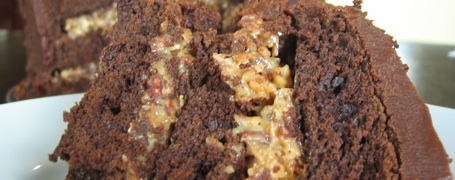
Pecans, coconut, and chocolate are all favorites of mine.  Any dessert that contains all of these things is a match made in heaven, in my opinion.  I wanted to tackle a layer cake this week, and when I ran across this recipe in The Gourmet Cookbook for Inside-Out German Chocolate Cake, I knew I had to try it.  I’ve made one or two layer cakes before, but I have by no means mastered the technique.

In this case, the recipe itself is daunting.  This is definitely not a weeknight cake–best left for the weekend or a day off, as it is very time consuming.  Baking the cake layers, chopping and toasting of the coconut and pecans, an hour and a half for the dulce de leche, refrigerating the chocolate glaze for an hour, refrigerating the cake for an hour before serving….there were lots of steps and lots of waiting.  The final assembly of the cake itself was tricky.

So was all that work worth it?  I’d say yes.  The cake turned out light and moist, and with a delicious chocolate flavor.  The cake itself was so good that I’ll probably be using this part of the recipe again for cupcakes and other chocolate cake variations.  Toasted coconut and toasted pecans are always delicious.

What were the downsides?  The dulce de leche didn’t seem like anything special to me, and I think I prefer a chocolate ganache made with cream, like the one used on the Creamy Nutella Cheesecake with Chocolate Ganache and Toasted Hazelnuts.  But all in all, this was a delicious cake, and once I have more experience assembling a layer cake, I hope I can make it look beautiful as well.

inside-out-german-chocolate-cake.jpg

Inside-Out German Chocolate Cake

from The Gourmet Cookbook, edited by Ruth Reichl

Serves 12

For Cake Layers:

  • 1 1/2 cups sugar
  • 1 1/2 cups all-purpose flour
  • 1/2 cup plus 1 tablespoon unsweetened Dutch-process cocoa powder
  • 3/4 teaspoon baking powder
  • 3/4 teaspoon baking soda
  • 3/4 teaspoon salt
  • 3/4 cup whole milk
  • 3/4 stick (6 tablespoons) unsalted butter, melted
  • 1 large egg
  • 1 large egg yolk
  • 3/4 teaspoon vanilla extract
  • 1/8 teaspoon almond extract
  • 3/4 cup boiling water

For Filling:

  • 7 ounces sweetened flaked coconut
  • 1 cup (4 ounces) coarsely chopped pecans
  • 1 (14 ounce) can sweetened condensed milk
  • 1 tablespoon vanilla extract

For Glaze:

  • 2 1/2 sticks unsalted butter
  • 10 ounces good semisweet chocolate, finely chopped
  • 3 tablespoons light corn syrup

Make the Cake Layers: Put racks in upper and lower thirds of oven and preheat oven to 350 degrees F.  Oil cake pans and line bottoms with rounds of parchment or wax paper.

Sift together sugar, flour, cocoa powder, baking powder, baking soda, and salt into a large bowl.  Whisk together milk, butter, egg, yolk, and extracts in a medium bowl until just combined.  Add egg mixture to flour mixture, beating with an electric mixture at low speed, then increase speed to high and beat for 1 minute.  Reduce speed to low and mix in boiling water until just combined (batter will be thin).

Divide batter among cake pans and smooth tops.  Place two pans in upper third of oven and one pan in bottom third (do not put top pans directly above bottom pan) and bake, switching position of pans and turning them around halfway through baking, until a wooden pick or skewer inserted in center of cakes comes out clean, 20 to 25 minutes total.

Transfer pans to racks to cool for 15 minutes.  Reduce oven temperature to 325 degrees F.  Run a think knife around edges of pans and invert layers onto racks, remove paper, and cool completely.

Make the filling while the layers cool:  Spread coconut on a baking sheet with sides and spread pecans on another sheet.  Toast coconut in lower third and pecans in upper third of oven, stirring occasionally, until golden, 12 to 18 minutes.  Transfer sheets to racks to cool.  Put a rack in middle of oven and increase oven temperature to 425 degrees F.

Pour condensed milk into pie plate and cover tightly with foil.  Put pie plate in larger baking pan, add enough boiling water to reach halfway up sides of pie plate, and bake for 45 minutes.

Add more boiling water as needed to reach halfway up sides of pie plate and bake, still covered, until milk is thick and brown, about 45 minutes more.

Remove pie plate from water bath.  Stir coconut, pecans, and vanilla into baked milk and keep warm, covered with foil.

Meanwhile, make the glaze:  Melt butter in a 3-quart saucepan.  Remove from heat, add chocolate and corn syrup, and whisk until chocolate is melted.  Transfer 1 cup glaze to a bowl and set remaining glaze aside in pan.  Refrigerate glaze in bowl, stirring occasionally, until thickened and spreadable, about 1 hour.

Assemble the cake:  For easier handling, put bottom cake layer upside down on a cardboard cake round or removable bottom of a tart or cake pan and place on a rack.  Set rack over a baking pan, to catch excess glaze.  Drop half of coconut filling by spoonfuls evenly over layer and gently spread with a wet spatula.  Top with another cake layer and spread with remaining filling in same manner.  Top with remaining cake layer.  Spread chilled glaze evenly over top and sides of cake.

Heat reserved glaze in pan over low heat, stirring, until glossy and pourable, about 1 minute.  Pour glaze evenly over top of cake, making sure it coats sides evenly.  Shake rack gently to smooth glaze.  Refrigerate cake until glaze is firm, about 1 hour.  Transfer cake to a plate before serving.

Blog Widget by LinkWithin