Oct 22 10
by cara
at 6:12 PM

Pumpkin Doughnut Muffins

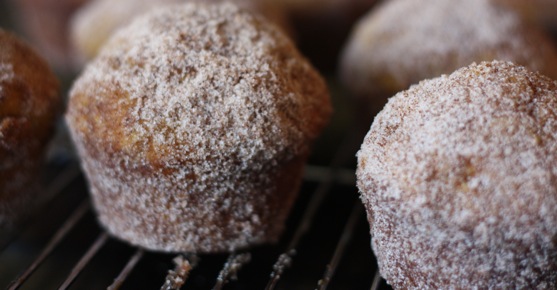
Another new pumpkin recipe to share!  And folks, this one is A-M-A-Z-I-N-G.  The texture of these muffins is very much like a cake doughnut (hence the name Doughnut Muffin, I suppose), and the pumpkin keeps them nice and moist.  The muffins themselves aren’t too sweet, which is good since they are rolled in melted butter, cinnamon and sugar!  Definitely not diet friendly, but beyond delicious!

Pumpkin Doughnut Muffins

from Everyday Food, November 2010

Makes 12

For the Batter:

  • 10 tablespoons (1 1/4 sticks) unsalted butter, room temperature, plus more for pan
  • 3 cups all-purpose flour (spooned and leveled), plus more for pan
  • 2 1/2 teaspoons baking powder
  • 1/4 teaspoon baking soda
  • 1 teaspoon coarse salt
  • 1/2 teaspoon ground nutmeg
  • 1/4 teaspoon ground allspice
  • 1/3 cup buttermilk
  • 1 1/4 cups pure pumpkin puree
  • 3/4 cup light-brown sugar
  • 2 large eggs

For the Sugar Coating:

  • 3/4 cup granulated sugar
  • 2 1/2 teaspoons ground cinnamon
  • 1/4 cup (1/2 stick) unsalted butter, melted

Preheat oven to 350 degrees F.  Butter and flour 12 standard muffin cups.  Make batter.  In a medium bowl, whisk together flour, baking powder, baking soda, salt, nutmeg, and allspice.  In a small bowl, whisk together buttermilk and pumpkin puree.  In a large bowl, using an electric mixer, beat butter and brown sugar until light and fluffy.  Beat in eggs, one at a time, scraping down bowl as needed.  With mixer on low, add flour mixture in three additions, alternating with two additions pumpkin mixture and beat to combine.

Spoon 1/3 cup batter into each muffin cup and bake until a toothpick inserted in center of a muffin comes out clean, 30 minutes.  Meanwhile, in a medium bowl, combine granulated sugar and cinnamon.  Let muffins cool 10 minutes in pan on a wire rack.  Working with one at a time, remove muffins from pan, brush all over with butter, then toss to coat in sugar mixture.  Let muffins cool completely on a wire rack.

Sharing this post with….

Oct 21 10
by cara
at 9:10 AM

GI Update: Adjusting to Life with a G-tube

I can’t believe it has already been a month since The Littlest Apple had his g-tube placed!

I can’t believe it’s ONLY been a month since The Littlest Apple had his g-tube placed!

Things have been going great.  There was a HUGE learning curve going from no tube to NG tube and having to learn how to use the pump for overnight feeds, but it didn’t take us long at all to get the hang of the g-tube.

I can’t even begin to tell you how happy we all are to have the g-tube!  The particular variety The Littlest Apple has is the MIC-KEY button, which looks a lot like the air valve on an inflatable beach ball.  I’m not going to share pictures of The Littlest Apple’s button, but if you know us in real life and are curious, just ask!  We’ll be glad to show you how it works.

I’m not as concerned about the MIC-KEY getting pulled out by curious little hands, and no one even knows it’s there, unless we tell them!  I feel like this has allowed The Littlest Apple to be a “normal” little 3 year old again!

I am so SO glad we went ahead with the surgery, because I have a feeling we’re going to be dealing with tube feedings for quite some time.  While still in the hospital, a dietician told us that after the high calorie formula is taken into account, The Littlest Apple still needs an additional 430-500 calories by mouth each day.  And while that number doesn’t sound too unattainable,  The Littlest Apple struggles to even eat that much most days.  So I think we’ve got a LONG road ahead before The Littlest Apple will be able to consume enough calories to not need to tube feeds at night, unless he miraculously outgrows his gastroparesis.  We definitely did the right thing.

The Littlest Apple had his surgery follow up appointment last week, and he currently weighs 26 pounds!!  According to the surgeon, that places him FINALLY on the charts for weight at 4%.  (Yay!)  He’s continuing to gain weight, and even though he’s still wearing several shirts that fit him over a year ago, all of last year’s pants are definitely too short.  I think his height is around 36″.  He’s the tiniest (and youngest) child in his preschool class (they had to put a special step stool in the bathroom just for him!).

We attempted making our own blenderized meals for the tube feeds, using some recipes given to us by our dietician.  (One particular recipe included couscous, green peas, orange juice, milk, and several other things)    I like the idea of knowing every single thing that goes in to his meal instead of using a formula with lots of things I can’t pronounce.  However, we haven’t been able to blend it to a smooth enough consistency to prevent it from clogging.  I’ve always wanted a Blendtec or Vitamix, and I think if we’re going to make blenderized meals, that’s the kind we’ll need.  Kind of a splurge though, and we FINALLY got the formula covered by my husband’s new health insurance (instead of paying $300 every 6 weeks, we’re paying $45). But I’m still wondering if The Littlest Apple is sensitive to one of the ingredients in the formula.  If doing blenderized meals helped bring down his energy level, I’d say it was worth every penny!

One last note for any other g-tube mommies out there.  I just ordered some Button Buddies, and we LOVE them!  They are absorbent reusable little pads in cute patterns (we’ve got dogs, frogs, dinos, and a firetruck) that wrap around the g-tube site to help prevent and absorb leaks and keep the button a little more secure (which also helps to prevent granulation tissue).  We think they’re pretty great!

Our next GI appointment is the week of Thanksgiving, and we’ve got an appointment with the surgeon to change The Littlest Apple’s MIC-KEY in January (in office).  Do I even have to tell you how nice it is to NOT have to deal with tube changes for 4 months?!  Unless of course, it breaks or gets pulled out….hope I didn’t just jinx us!

My only regret about the g-tube is that we didn’t do it sooner!

Oct 19 10
by cara
at 3:20 PM

Good Reads: South of Broad, by Pat Conroy

South of Broad is set in Charleston, South Carolina, and that beautiful city plays an important role in the novel.  Charleston native Leopold Bloom King (Leo, for short) grows up in the shadow of his older brother Stephen, until Stephen’s tragic death.  The tragedy shakes his family to the core, and leaves Leo mentally unstable and lonely.  Never the popular kid, Leo finds himself befriending other outsiders and new kids at his high school where his cold, Ulysses loving mother is the principal.  This group of misfits includes 3 orphans, 2 of Charleston’s richest kids (kicked out of the their private school for using drugs) and a set of theatrical twins with a mysterious past.  The story begins in 1969, the year Leo’s high school is integrated, and racism and class divisions are both significant topics in the novel.

We are introduced to all of the characters, then the story flashes forward 20 years to a knock on the door that changes everything for this group of friends.  The book moves back and forth between 1969 and 1989, and I really enjoyed seeing the characters as high schoolers and as grown ups.  It was interesting to see what became of each of them (who married who, their professions) , then to read a flashback to learn how they got to where they are in 1989.  One of the things I love most about this book are the rich character descriptions, particularly that of Leo.  There are 10 friends in the “group” plus a handful of additional characters, but I had no trouble keeping them straight since each is very unique.

This is one of those amazing stories that I could read over and over again, and that’s not something I say often.  I’m looking forward to checking out some of Pat Conroy’s other novels, particularly The Prince of Tides.

Have you read any of Pat Conroy’s novels?  What did you think of them?  What are you reading now?

Disclosure: I have not been asked to review this book.  It was just a great book that I wanted to share with you.  The links in the post are Amazon Affiliate links.


Oct 17 10
by cara
at 2:22 PM

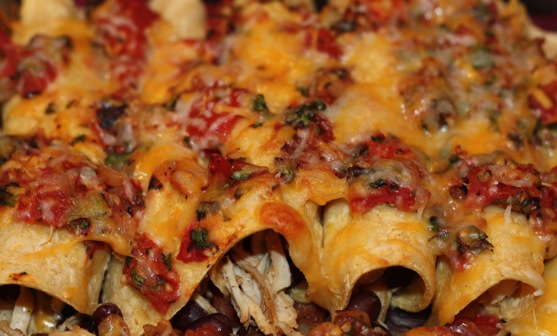
Chicken and Black Bean Enchiladas

Before today, if you searched this blog for “enchiladas” you would have come up empty-handed.  Even though I adore enchiladas (especially Classic Tex Mex from Chuy’s) I’ve had trouble cooking them at home with any success.  Flour tortillas seem to turn gummy no matter what I do, the sauces have never been to my liking, and the fillings were all mediocre.

But I keep trying.  I only use corn tortillas now, and I prefer homemade sauces to canned.

And I think I’ve finally found some enchiladas that we love!  I normally prefer smooth sauces, but the flavor of this simple homemade sauce is great, thanks to the fire roasted tomatoes, fresh cilantro and LOTS of garlic.  I also enjoy the addition of black beans in the filling instead of just meat.  The meat can be either chicken or ground beef, and I’ve included the ground beef variation at the bottom of the recipe.  (I first made this recipe with ground beef, and these enchiladas are yummy either way!)

Chicken and Black Bean Enchiladas

adapted from Parents Magazine, March 2010

Ingredients:

  • 2 tsp. olive oil
  • 1 small yellow onion, chopped
  • 1 Tbs. chopped garlic
  • 1 14 oz can diced fire-roasted tomatoes
  • 1/2 tsp. ground coriander
  • 1/2 tsp. ground cumin
  • 1/2 tsp. dried oregano
  • Pepper to taste
  • 1/4 cup chopped fresh cilantro
  • 1 1/2 cups shredded chicken (I used Crock Pot Mexican Chicken)
  • 1 15 oz can black beans, rinsed and drained
  • 8-10 corn tortillas
  • 1 1/4 cups cheddar or Mexican blend cheese, divided

Preheat oven to 350 degrees F.

Heat oil in a large nonstick skillet.  Add onion and cook for about 5 minutes, or until softened.  Add garlic and cook for 1 minute longer, but don’t allow garlic to brown.  Add the tomatoes, coriander, cumin, oregano, and pepper; cook for a few minutes longer.  The finished sauce will be a bit chunky.  Stir in cilantro.

Meanwhile, stir together chicken, beans and 3/4 cup of the cheese.  Season with garlic salt and cumin if desired.  Warm the tortillas in the microwave (wrapped in a damp paper towel) for about 30 seconds to make them easier to roll.  Spread 1/2 cup of sauce into a rectangular baking dish.  Divide the chicken mixture among the tortillas.  Fold over tortilla sides, place seam side down in the baking dish.  Pour the remaining sauce on top and bake uncovered, about 15 minutes.  Sprinkle on remaining cheese, and bake another 5 minutes or until cheese is melted.

Ground Beef Variation: Cook 1/2 pound ground beef until browned.  Stir together ground beef, beans and 3/4 cup of cheese and proceed with recipe as directed above.

Do you make enchiladas at home?

Oct 16 10
by cara
at 3:03 PM

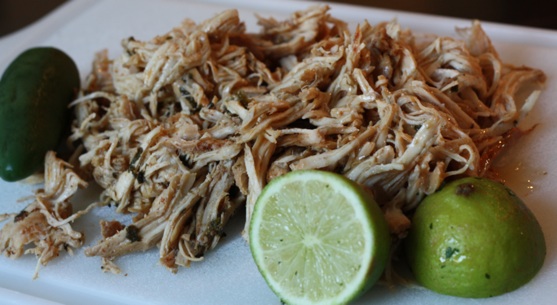
Crock Pot Mexican Chicken

The Crock Pot lends itself well to shredded chicken and pork that is perfect for soft tacos, enchiladas, quesadillas, salads and casseroles.  This is one of my favorite ways to use my Crock Pot!  In the past, I’ve used pork, as in the Cafe Rio Sweet Pork and Slow Cooker Pork Tacos, two of our family (and guest) favorites.  But this chicken recipe turned out even more flavorful than my Chicken Soft Taco Filling, and is so versatile!  I served this chicken the first night as soft tacos, then used the leftovers to create a delicious new enchilada recipe (coming up next).  Since I was short on time, I simplified the original recipe, and it still turned out great.

Crock Pot Mexican Chicken

adapted from goodLife{eats}

Ingredients:

  • 4 boneless, skinless chicken breasts
  • 1 1/4 teaspoon cumin
  • 1 tablespoon chili powder
  • 1/2 teaspoon coriander
  • 1/4 teaspoon paprika
  • 1 1/2 teaspoon salt
  • 1/2 tsp black pepper
  • 1/3 cup chicken broth
  • 1/3 cup (packed) cilantro leaves, chopped
  • 2 limes
  • 1 large onion, chopped
  • 1 jalapeno, seeded and minced
  • 4 garlic cloves, minced
  • 1 tablespoon olive oil

Add all ingredients to crock pot and cook on high for 3-5 hours.  Shred chicken and enjoy!

Oct 14 10
by cara
at 1:54 PM

Life With A Spirited Child: Labels

This is the third post in the Life With A Spirited Child Series.  Missed a previous post?

Life With a Spirited Child: New Series Intro

The Characteristics

Next week we’ll start discussing parenting tactics for each of The Characteristics.

image from mdanys via Flickr Creative Commons

Wild.  Out of control.  Disruptive.  Crazy.  Whiny.

Those are all words I have used to describe my three year old son in the last week or so.  He’s been challenging and I’ve been in tears several times.  I’ve stalled on this Spirited Child post because I’ve been feeling completely overwhelmed by his crazy energy and less-than-stellar behavior.  At the same time, I need to be writing this post now more than ever.

Because you know what all of those labels have in common?  They’re ALL NEGATIVE.

Negative Labels Have Negative Effects

With spirited children in particular, it becomes all too easy to label them in this negative manner.  As parents of spirited children, it’s crucial that we stop putting negative labels on our children, and I’m writing this post to myself as much as to the rest of you!  We need to see the positive or at least the potential strength that each of these behaviors presents.

This is especially important when you’re speaking about your child in your child’s presence.  This is definitely something I need to work on.  The Littlest Apple has said “I’m wild” and “I’m not a good listener” to me recently, and that just shows how much I’ve said those things myself.  By placing negative labels on our children, those labels become expectations, and they start to act in ways consistent with those expectations.  They become wild.  They become disruptive.  They become bossy and manipulative.  This is called the Pygmalion Effect, a form of self-fulfilling prophecy.  Kind of scary, huh?

Encouraging words and teaching your child how to handle these behaviors with a firm but kind heart would go so much further, don’t you think?

image from Tacit Requiem via Flickr Creative Commons

Change the Labels

We should speak about our children and to our children with words that make them (and us) feel good.  We should use words that are positive.  Words that focus on what’s right about their behavior, not what’s wrong with it.  Think about advertising companies and realtors and the words they use to describe their products.  The words that make you think how cool, fun, charming and useful their product is .  We need to turn our negative labels into labels that make us smile, that make us proud, and even ones that make us laugh.  Labels, whether spoken aloud or internalized, affect how we feel, act, and think about our spirited children.  But how do you even begin to change your thinking about a trait that drives you crazy?

Here are some examples of negative labels with their more positive counterpart in italics:

bossy   future manager

distracted, not listening    curious, perceptive

wild, never stops   energetic, full of life, busy

resistant   focused

whiny   expressive

negative   analytical

reckless   adventurous

nags, annoys and otherwise drives you crazy to get what he wants   argues intelligently for what he wants

argumentative, demanding   persistent

picky  selective

rebellious   independent

manipulative   charismatic, persuasive

overwhelming   powerful

stubborn   goal-oriented

thin-skinned, high-strung   sensitive

dangerous thrill-seeking behavior   likes to learn, explore, try new things

noisy, loud  enthusiastic, zestful

explosive   dramatic

Look For the Positive.

(Even if you have to search really hard!)

I know some of you are rolling your eyes right about now.  I know first hand that this is a DIFFICULT exercise to do, and that it can be quite a stretch to put a positive spin on some of your spirited child’s more challenging behaviors.  Believe me, when my son is spitting orange juice all over the living room carpet, the last thing I’m thinking is “oh, he’s so imaginative!”.  I want to yell “What on EARTH where you THINKING?!”

Rethinking the way we label our children is NOT easy, particularly in the midst of their more challenging behaviors.  That is why I encourage you to take a few minutes to sit down and work through this exercise when your blood ISN’T boiling at their latest shenanigans.  List all of the adjectives and labels you’ve placed on your child recently.  Be sure to use not only labels that you’ve used or thought, but also those your friends, family, and teachers have used to describe your child.

Even the awful ones.

ESPECIALLY the awful ones!

Then try your hardest to come up with a  positive “spin” for each of those traits.  Sit down with your spouse, a family member or a friend who knows your child well if you’re really struggling.  Take some deep breaths and think of your child at his most charming and loveable self.  Recall some of your favorite memories of your child.  The ones that make you smile or chuckle.  (I’m smiling and feeling calmer already!)

For me, that includes The Littlest Apple’s infectious laughter and his enthusiasm and zest for construction trucks and Buzz Lightyear.  (As you can see from the list above, those are the words and images I remind myself of when I’m thinking “You’re too LOUD!!”)  When he’s jumping off the furniture, I try to remind myself that he’s energetic and full of life (and wishing I had that kind of energy).  When I have to remind him for the 5th time to clean up his toys, I conjure up an image of Curious George, his favorite monkey, who is just so curious that he can’t help himself from exploring everything around him instead of cleaning up.

image from Arwen Abenstern via Flickr Creative Commons

Practice Parenting With the Postive Labels

Instead of saying, “No! Stop!  Get down!  Listen to me! I said NO!”…..

you can say things like “You sure do have a lot of energy today!  Why don’t we go for a short walk around the block?” or “You are very persistent with your requests to play instead of getting ready for bed!”  This takes lots of practice, and I’m definitely still in the beginner stage here.  I get so angry and frustrated with The Littlest Apple’s behavior sometimes, but I’m forcing myself to call to mind this list of negative/positive traits.

If we can start using this kind of language to transform how we think about our spirited children, we can become more tolerant, kind, understanding and creative in our efforts to help our spirited children stay “on track. “  Besides, doesn’t it feel so much better to the parent of a child that is curious, energetic, persuasive, creative and enthusiastic?  That’s how I can describe The Littlest Apple, and now I’m smiling as I write this.  What a neat kid!  Using those labels makes me feel so proud and lucky to be his mom!

Words make all the difference!

How would you describe your spirited child with these new positive labels?
Oct 12 10
by cara
at 8:24 PM

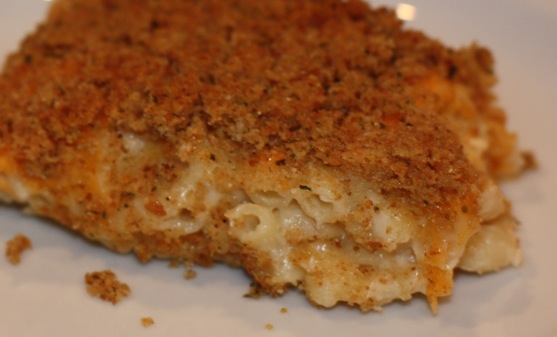
Baked Mac and Cheese

Blogging is definitely one of those things that can be hard to get back to if you take a few days off.  Part of my last few days sans blogging was about relaxing over the weekend, and then I just had trouble getting started again.

So today, you get a delicious recipe for Baked Mac and Cheese!  I’ve attempted homemade mac and cheese several times, but this is first recipe that’s ever been a success.  The Picky Apple gave it two thumbs up, and I’m already looking forward to trying out the leftovers tomorrow.

Baked Mac and Cheese

from Brown Eyed Baker

Ingredients:

  • 8 oz. elbow macaroni
  • 4 Tbsp. butter, divided
  • 2 Tbsp. flour
  • 1/2 tsp. salt
  • 1/2 tsp. dry mustard
  • 2 cups milk
  • 1/2 cup cheddar cheese, divided
  • 1/2 cup mozzarella cheese, divided
  • 1/2 cup Swiss cheese, divided
  • 1/2 cup seasoned bread crumbs

Cook macaroni according to package directions; drain.  Preheat oven to 400 degrees.  Melt 2 T. butter in a large saucepan over medium heat. Add flour and salt and stir until mixture is smooth. Stir in dry mustard. Add milk gradually, stirring constantly.  Cook over low heat, stirring constantly, until thickened, about 5 minutes.  Stir in 1/4 cup of the cheddar, 1/4 cup of the mozzarella, and 1/4 cup of the Swiss. Mix cheese sauce and macaroni in a large bowl. Spoon into a 9 x 7 inch baking dish. Sprinkle with remaining cheddar, mozzarella and Swiss.  Melt remaining butter in saucepan over medium heat. Combine bread crumbs and melted butter in a small bowl and mix well. Sprinkle on top of the cheese. Bake until hot and bubbly, about 15 minutes.

Oct 8 10
by cara
at 6:02 PM

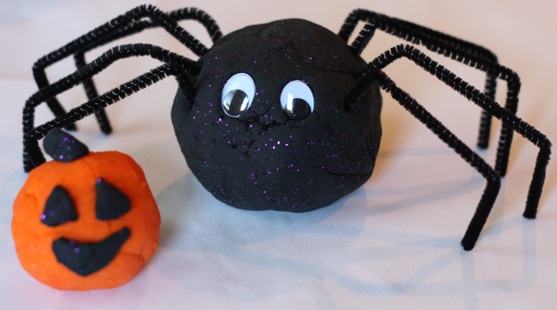
Halloween Playdough

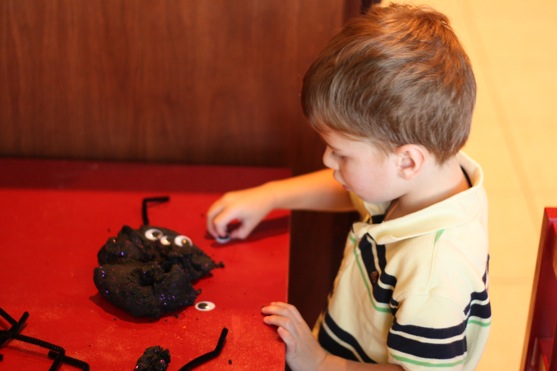
I’ve got the next Life With a Spirited Child post in the works, but I wanted to post this Halloween playdough sooner rather than later.  I created some new Halloween playdough to go along with our Halloween Sensory Bin.  I made 2 types: black with lots of purple glitter and orange.  Both are unscented.  I’ll break out the scents again in November’s playdough.

Have you ever used black food coloring before?  I’ve got the Wilton gels, and my hands are now stained a purplish/reddish color.

I gave The Littlest Apple some pipe cleaners and googly eyes to use for some spider and monster creations this month, and he LOVES it!

Here’s The Littlest Apple creating a “monster”: (I haven’t shown him much since his surgery, have I?  So nice to see his little cheeks again!)

Oct 7 10
by cara
at 7:46 PM

Texture Collage

The Fall “semester” of our Art Playgroup started this week!  My goal is to include a little more instruction and discussion with the kids and parents about their projects as we work on them, in preparation for the art classes I plan to teach as part of my dream business.  I’ll discuss why that didn’t quite go as planned in tomorrow’s Life With a Spirited Child post (ahem!).


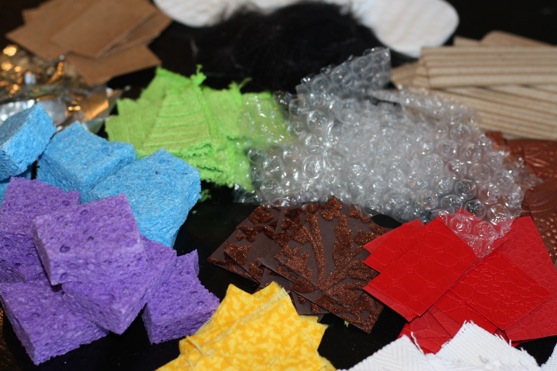
This Texture Collage was one of our projects this week, and I had a blast picking out all of the materials for this project!  I’ve seen this idea in a couple of books and blogs, most recently on Teach Preschool.  Each child was given a selection of textured bits and pieces to use for a collage, and I had larger texture samples in the middle of the table to pass around and explore (that part didn’t quite happen).  We glued the materials to cardstock to keep the collages nice and sturdy.  I explained the meaning of “texture,” and encouraged the kids to talk about the scraps as they felt them and glued them down.  We talked about words like bumpy, furry, soft, rough, smooth, spongy, and squishy.  We also discussed which texture was our favorite.  It would also be fun to discuss textures we DON’T like.  (I don’t like sponge or cotton balls.)  The materials included:

  • aluminum foil
  • cotton makeup pads (with different textures on each side)
  • flannel
  • bubble wrap
  • sandpaper
  • corrugated cardboard
  • scrapbook paper with a raised velvet design
  • crocodile print paper
  • microfiber cloth
  • fake fur
  • sponge
  • and a raised-tin-design paper


Oct 6 10
by cara
at 8:31 PM

Harvest Pumpkin Dip

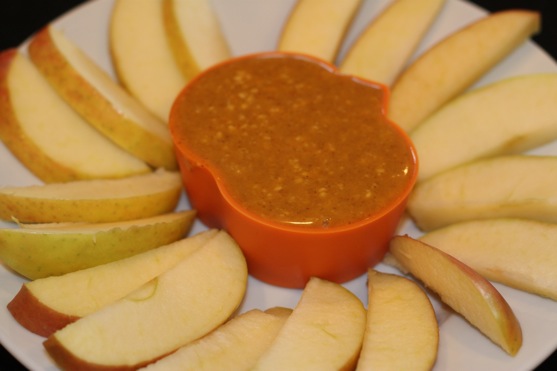
I’ve seen many many variations of this dip in magazines and on blogs over the last couple of years, but this was my first time to try it out.  I needed a quick snack for our late afternoon art playgroup yesterday, so I served up this Harvest Pumpkin Dip with apple and pear slices.  This dip would also be great with graham crackers or ginger snaps.

Harvest Pumpkin Dip

from Taste of Home

Ingredients:

  • 1 package (8 ounces) cream cheese, softened
  • 2 cups confectioners’ sugar
  • 1 can (15 ounces) solid-pack pumpkin
  • 3 teaspoons pumpkin pie spice
  • 1 teaspoon vanilla extract
  • 1/2 teaspoon ground ginger

In a large bowl, beat the cream cheese and confectioners’ sugar. (Picky Apple note: Be sure to follow this step instead of just dumping everything in the bowl like I did!) Gradually add the pumpkin, pie spice, vanilla and ginger; beat until smooth. Refrigerate for at least 30 minutes before serving.  Serve with fruit. Refrigerate leftovers.

Blog Widget by LinkWithin